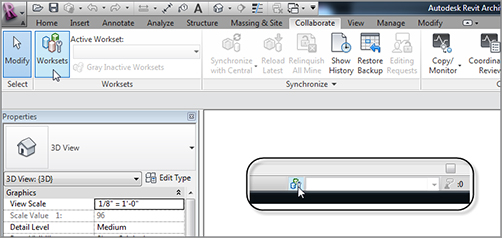
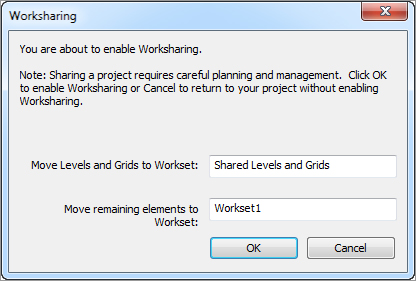
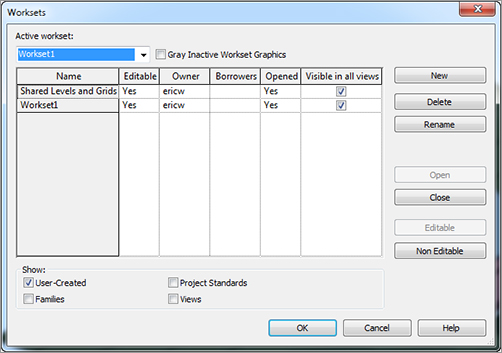
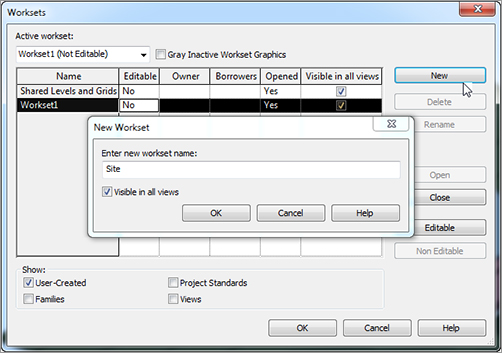
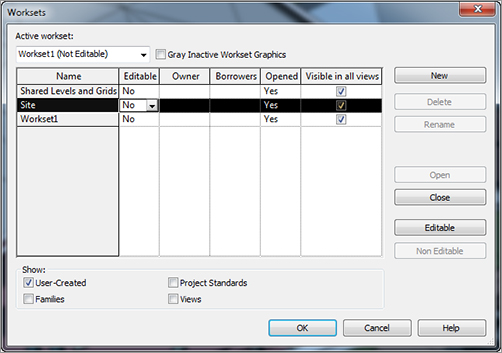
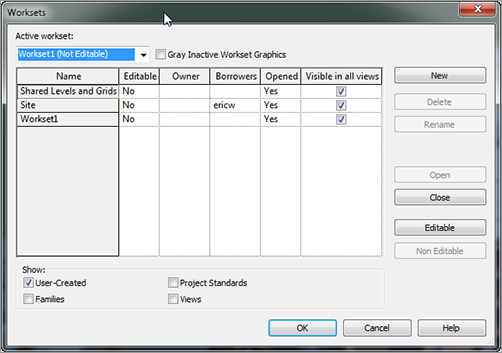
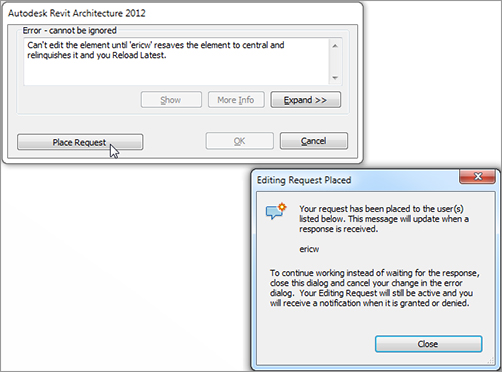
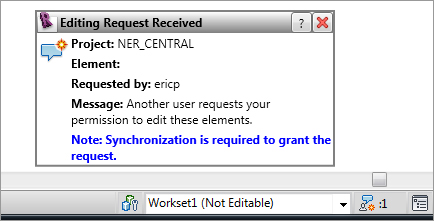
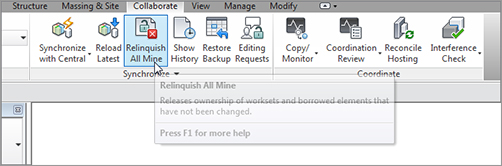
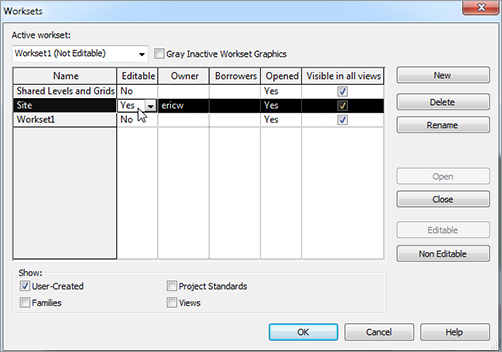
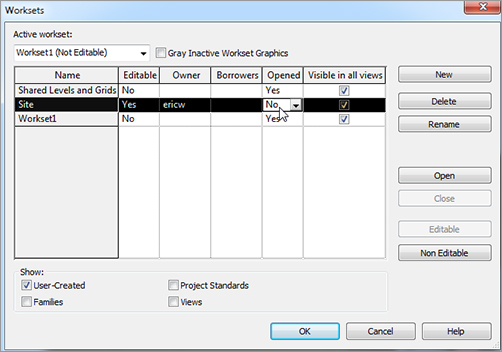
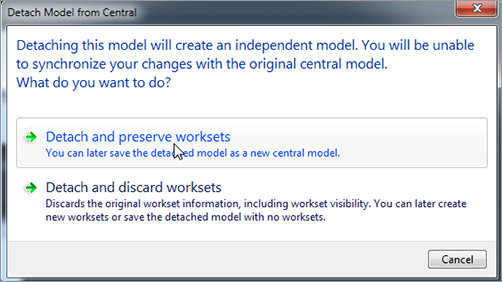
It’s quite ironic that the last chapter of this book contains information that many of you will need to get your first Revit project off the ground. That is, how do you work on a project when multiple people need to be in the model? Revit is only one model, right? You may be surprised, but the answer to the question posed in the chapter introduction, and the procedure itself, aren’t as difficult as some make them out to be. I have seen many explanations on the subject of project collaboration that are far-reaching and convoluted, and cause an air of uneasiness. Collaboration isn’t as horrible as it sounds, and this chapter will explain project collaboration in the simplest terms possible. First we’ll establish exactly what you’re trying to accomplish and how to go about doing it. The backbone of project collaboration is the functionality of worksharing. The concept of worksharing in Revit, broken into its simplest form, is this: This process saves a linked copy to your FIGURE 22.1 The basic file-sharing configuration OK, so that’s the concept of worksharing. It’s now time to drill down and see how to activate this network of linked files. As mentioned earlier, Revit has a function called worksets. The worksets are the backbone of this entire concept. The worksets function in Revit influences your model and the way you go about working more than anything you can do. Using worksets is a mode you literally have to enter into. Essentially, worksets are a way to divide your model. After you activate worksharing, every element in your model has a workset associated with it. Levels and grids are on their own workset, and everything else in the model is automatically assigned Workset 1. This assignment is in the form of a parameter that you can see in the Properties dialog; you can change that parameter if necessary. Why would you want to change it? Good question. Here’s an example: say you’re modifying an interior partition, and your coworker (who is working on a local model) tries to edit that same wall. Your coworker will be denied access to the wall. But nothing is stopping them from working on another wall in the same area, one that you intended to make the same modifications to. This could get messy fast. To avoid this situation, you can add all your interior partitions to a workset called Interior Partitions and lock everybody else out of any item you’ve placed on this workset. Now that’s the way to work! Obviously, this process isn’t without its rules, quirks, and parts that need further explanation. To get started, go to the book’s web page at To enable worksets and start the worksharing process, follow these steps: FIGURE 22.2 Clicking the Worksharing button FIGURE 22.3 The Worksharing dialog FIGURE 22.4 The Worksets dialog Now that you’ve activated the worksets and saved the model, it’s time to create the central model. This will always be the next step in the process. Creating the central model is generally a one-time deal. You create it immediately after you enable your worksets. The individual who creates the central model needs to be your best Revit user. If not, and this procedure is done incorrectly, you will have struggles for the entire life of the project. Okay, best Revit user, follow this procedure to learn how to create the central model: FIGURE 22.5 Saving the project using Save As FIGURE 22.6 Modifying the settings before you save the file FIGURE 22.7 Clicking the Synchronize Now button FIGURE 22.8 Releasing the worksets by clicking No for Editable You made these worksets not editable because when you’re working in the central file, you always want to leave it with no editable worksets. That way, users don’t have access to these worksets in their local models. The next task you need to tackle in the creation of a central model is how to make a new workset and move some components onto it. The objective of the following procedure is to create a Site workset and to move the topography and the site components to this workset. Follow these steps: FIGURE 22.9 Creating a new workset FIGURE 22.10 Making all worksets not editable Next, you’ll create your local model. Luckily, you’ve done all the difficult work. Setting up the central file is the hardest part of the worksharing process and is usually done by the BIM manager or at least the BIM lead person on the project. The act of creating a local file is as simple as issuing a Save As. With the central model in place, you’re ready for the rest of your team to have at it. Although I keep mentioning how easy most of this stuff is, there are some dangers to look out for. First, never open the central model and stay in it. When you’re in the process of creating a local model, you select the central model and select the Create New Local option. If you don’t make sure this check box is selected, guess what? You’re sitting in the central model. If this occurs, nobody has access to synchronize with the central model. Shame on you. This section of the chapter will guide you through the process of creating a local model. Follow along: Congratulations! You’re the proud owner of a new Revit file that knows your name and everything! Yes, it knows your name. You see, when you create the local model, it’s yours to keep. This file resides in your personal documents folder on your FIGURE 22.11 Creating a new local model With the local model saved, you’re free to work away. As you’ll recall, you created the central model with three worksets: Shared Levels And Grids, Workset1, and Site. You, as a local user, can begin working away. As you start editing the model, however, Revit makes a note that you’re borrowing a workset. Revit also notes that you physically own the item you’re editing. Borrowing? Let’s stop and look at what this means. In Revit worksharing, you can be either a borrower of a workset or an owner of a workset. If you’re a borrower, the rest of the design team can make modifications to elements in the workset but not to the specific element you’re working on. The objective of the next exercise is to make a modification to the site and investigate what happens in the Worksets dialog. Follow these steps: FIGURE 22.12 Borrowing a workset Because there is no good way to have you go through an exercise, you can take your hand off the mouse and read for a few paragraphs. If you’re at work and have another willing participant, have them create their own local model, and ask them to start making edits to the model. Notice that the Site workset still says No for Editable. This means that if Cassidy begins working on the shrubs right next to the one you just deleted, she can do so. You don’t own the workset—you’re just borrowing it. If you change the shrub to a tree (or make any modifications whatsoever to the shrub), Cassidy can’t make any edits to the new tree. When she tries to edit the tree, she gets the error shown in Figure 22.13. She can then place a request that Eric will see at the bottom of his screen. FIGURE 22.13 Eric is modifying the element. After the request is placed, Eric sees it pop up at the bottom of the screen, as shown in Figure 22.14. FIGURE 22.14 Please release me. When you see that someone is begging you to release an item, you get to do the right thing and grant the request. You do this by clicking the Relinquish All Mine button on the Collaborate tab, as shown in Figure 22.15. FIGURE 22.15 The Relinquish All Mine button See? You can all get along! Until you pull the next move. Suppose you don’t want anybody else on the team to modify anything in the entire Site workset. There are times when this will occur. To learn how to do this, follow along: FIGURE 22.16 Occupying the entire workset And so the workday goes in an environment of sharing and getting along. Speaking of environment, suppose you could not care less about the site. There is a good chance that you don’t even want to see it. Well, you’re in luck. Because you have worksets enabled, you can make it so Revit doesn’t even load the site into your local model. I’m making a big deal out of a simple task only because it can speed up your performance—and nothing can bog down a Revit model more than a huge site complete with landscaping and maybe an image. Switching the Opened status to No in a workset forces Revit to not load the workset into your model. If you make an edit that has an influence on the site, don’t worry: Revit will take care of that in the central model. To turn off the site, follow this procedure: FIGURE 22.17 Changing the Opened status to No Having the ability to turn off large portions of a model can be a tremendous advantage as you move forward in Revit. You need to exercise caution, however. You could easily deceive yourself into thinking that some portions of the model hadn’t been created yet. You can also detach a model from central. This is sometimes useful when things run amok—and they will, from time to time. Detaching from central allows you to strip a model of all its owners and borrowers. You can then save back over the top of the existing central model so everyone can get back to enjoying their Revit experience. Let’s look at some maintenance procedures: FIGURE 22.18 Detaching from Central FIGURE 22.19 Preserving the worksets Here we are at the end of the book! As I mentioned at the beginning, this book is meant to serve as a step-by-step tutorial as well as a desk reference. There are also classroom-style datasets and training material on the book’s web page. As always, please feel free to contact me directly at ewing@csos.com.
CHAPTER 22
Project Collaboration
Enabling and Utilizing Worksharing
C: drive under My Documents. Now you and your coworkers can all access the same model at the same time. What a productive way to get a job out the door! (See Figure 22.1)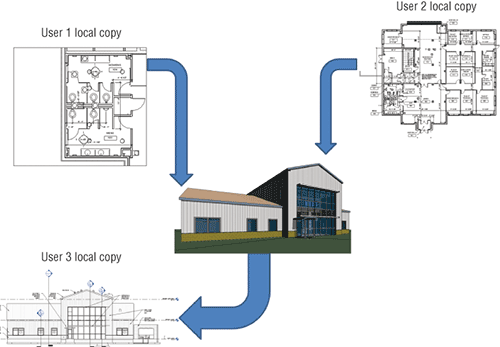
Enabling Worksets
www.sybex.com/go/revit2012ner. From there, you can browse to Chapter 22 and find the file called NER-33.rvt.
NER-33.rvt file.
Creating a Central Model
![]() Project, as shown in Figure 22.5.
Project, as shown in Figure 22.5. 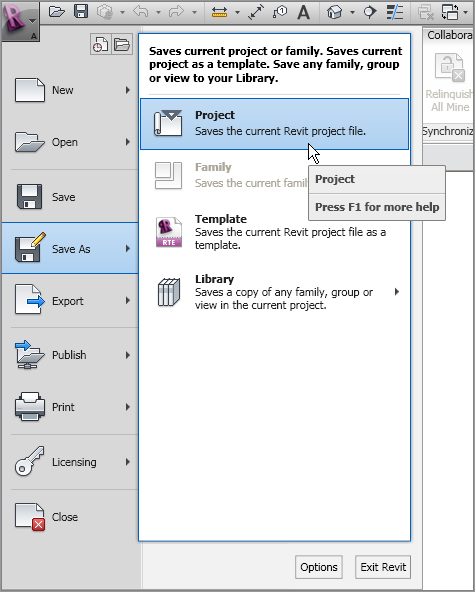
NER-CENTRAL.rvt.
![]() Synchronize Now, as shown in Figure 22.7. Doing so saves any changes made.
Synchronize Now, as shown in Figure 22.7. Doing so saves any changes made. 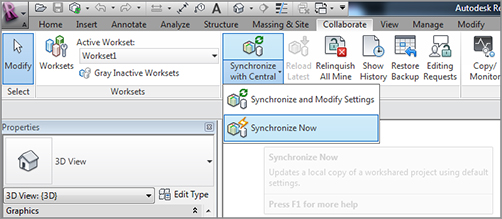
Creating a Local File
NER_CENTRAL file.
C: drive, with your username. Not only does your local model keep a live link back to the central model, but it also knows who it belongs to. Revit does this for a good reason: this file represents you within the team.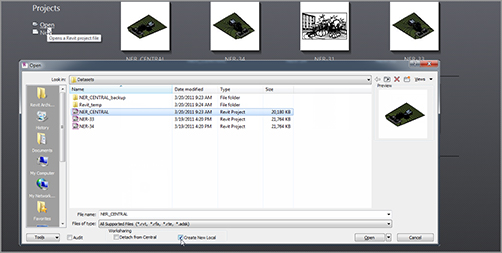
Working in the Revit Shared Environment
Loading or Not Loading a Workset
Detaching from Central
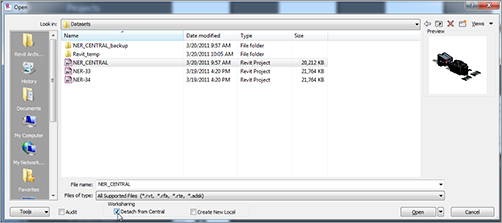
NER_CENTRAL.rvt.
Are You Experienced?
Now you can…