In this chapter, you will • Learn what Auto Scaling is • Understand the benefits of Auto Scaling • Understand various Auto Scaling policies • See how to set up Auto Scaling • Learn what Elastic Load Balancing is • Understand how Elastic Load Balancing works • See the various types of load balancing Auto Scaling is the technology that allows you to scale your workload up and down automatically based on the rules you define. It is one of the innovations that makes the cloud elastic and helps you customize per your own requirements. Using Auto Scaling, you don’t have to over-provision the resources to meet the peak demand. Auto Scaling will spin off and configure new resources automatically and then take the resources down when the demand goes down. In this chapter, you’ll learn all about the advantages of Auto Scaling. On-premise deployments require customers to go through an extensive sizing exercise, essentially guessing at the resources required to meet peak workloads. Experience shows that it’s almost impossible to get the sizing estimates right. Most often customers end up with underutilized resources while underestimating resources for peak workloads. Other times customers plan for the peak by over-provisioning the resources. For example, you might provision all the hardware for Black Friday at the beginning of the year since you get your capital budget during the start of the year. So, for the whole year those servers run only with, say, 15 to 20 percent CPU and achieve the peak during the Black Friday sale. In this case, you have wasted a lot of compute capacity throughout the year that could have been used for some other purpose. With Amazon Web Services (AWS), you have the ability to spin servers up when your workloads require additional resources and spin them back down when demand drops. You can set up rules with parameters to ensure your workloads have the right resources. You can integrate Auto Scaling with Elastic Load Balancing; by doing so you can distribute the workload across multiple EC2 servers. CAUTION People often think about Auto Scaling as Auto Scaling for EC2 servers, but now Auto Scaling is available for many AWS products, so you should not restrict your thoughts to EC2 only. These are the main benefits of Auto Scaling: • Dynamic scaling The biggest advantage of Auto Scaling is the dynamic scaling of resources based on the demand. There is no limit to the number of servers you can scale up to. You can scale up from two servers to hundreds or thousands or tens of thousands of servers almost instantly. Using Auto Scaling you can make sure that your application always performs optimally and gets additional horsepower in terms of CPU and other resources whenever needed. You are able to provision them in real time. • Best user experience and performance Auto Scaling helps to provide the best possible experience for your users because you never run out of resources and your application always performs optimally. You can create various rules within Auto Scaling to provide the best user experience. For example, you can specify that if the CPU utilization increases to more than 70 percent, a new instance is started. • Health check and fleet management You can monitor the health checks of your Elastic Compute Cloud (EC2) instances using Auto Scaling. If you are hosting your application on a bunch of EC2 servers, the collection of those EC2 servers is called a fleet. You can configure health checks with Auto Scaling, and if a health check detects there is a failure on an instance, it automatically replaces the instance. It reduces a lot of burden from you because now you don’t have to manually replace the failed instance. It also helps to maintain the desired fleet capacity. For example, if your application is running on six EC2 servers, you will be able to maintain the fleet of six EC2 servers no matter how many times there is an issue with an EC2 server. Alternatively, if one or more servers go down, Auto Scaling will start additional servers to make sure you always have six instances running. When you configure Auto Scaling with Elastic Load Balancing (ELB), it is capable of doing ELB health checks as well. There are various kinds of health checks ELB can do, such as for hardware failure, system performance degradation, and so on. Detecting these failures on the fly while always managing a constant fleet of resources is really painful in the on-premise world. With AWS, everything is taken care of for you automatically. • Load balancing Since Auto Scaling is used to dynamically scale up and down the resources, it can take care of balancing the workload across multiple EC2 instances when you use Auto Scaling along with ELB. Auto Scaling also automatically balances the EC2 instances across multiple AZs when multiple AZs are configured. Auto Scaling makes sure that there is a uniform balance of EC2 instances across multiple AZs that you define. • Target tracking You can use Auto Scaling to run on a particular target, and Auto Scaling adjusts the number of EC2 instances for you in order to meet that target. The target can be a scaling metric that Auto Scaling supports. For example, if you always want the CPU’s utilization of your application server to remain at 65 percent, Auto Scaling will increase and decrease the number of EC2 instances automatically to meet the 65 percent CPU utilization metric. • Cost control Using Auto Scaling, you can also automatically remove the resources you don’t need in order to avoid overspending. For example, in the evening when the users leave, Auto Scaling will remove the excess resources automatically. This helps in keeping the budget under control. • Predictive scaling Auto Scaling is now integrated with machine learning (ML), and by using ML Auto Scaling, you can automatically scale your compute capacity in advance based on predicted increase in demand. The way it works is Auto Scaling collects the data from your actual usage of EC2 and then uses the machine learning models to predict your daily and weekly expected traffic. The data is evaluated every 24 hours to create a forecast for the next 48 hours. Auto Scaling is most popular for EC2, but in addition to EC2, Auto Scaling can be used to scale up some other services. You can use application Auto Scaling to define scaling policies to scale up and down these resources. Here are the other services where Auto Scaling can be used: • EC2 spot instances • EC2 Container Service (ECS) • Elastic Map Reducer (EMR) clusters • AppStream 2.0 instances • Amazon Aurora Replicas • DynamoDB Let’s see how Auto Scaling works in real life. Say you have an application that consists of two web servers that are hosted in two separate EC2 instances. To maintain the high availability, you have placed the web servers in different availability zones. You have integrated both the web servers with ELB, and the users connect to the ELB. The architecture will look something like Figure 6-1.
CHAPTER 6
Auto Scaling

Benefits of Auto Scaling
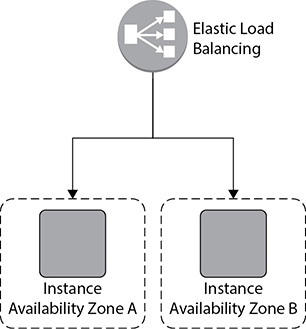
Figure 6-1 Application with two web servers in two different AZs
Everything is going well when all of a sudden you notice that there is an increase in the web traffic. To meet the additional traffic, you provision additional two web servers and integrate them with ELB, as shown in Figure 6-2. Up to this point you are doing everything manually, which includes adding web servers and integrating them with ELB. Also, if your traffic goes down, you need to bring down the instances manually since keeping them is going to cost you more. This is fine and manageable when you have a smaller number of servers to manage and you can predict the traffic. What if you have hundreds or thousands of servers hosting the application? What if the traffic is totally unpredictable? Can you still add hundreds and thousands of servers almost instantly and then integrate each one of them with ELB? What about taking those servers down? Can you do it quickly? Not really. Auto Scaling solves this problem for you.
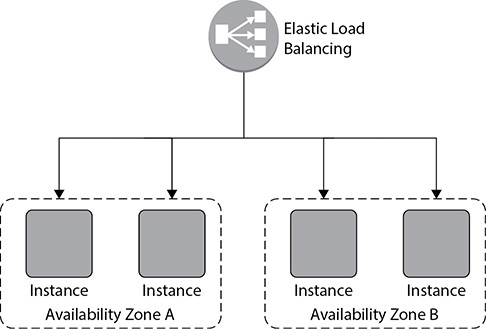
Figure 6-2 Adding two additional web servers to the application
When you use Auto Scaling, you simply add the EC2 instances to an Auto Scaling group, define the minimum and maximum number of servers, and then define the scaling policy. Auto Scaling takes care of adding and deleting the servers and integrating them with ELB based on the usage. When you integrate Auto Scaling, the architecture looks something like Figure 6-3.
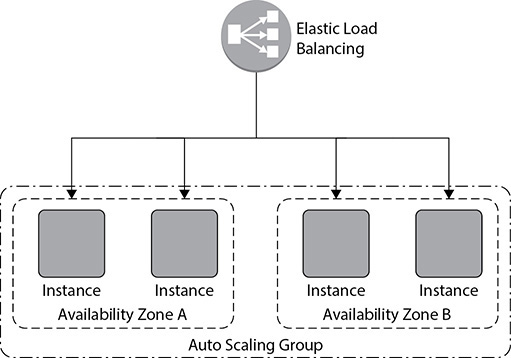
Figure 6-3 Adding all four web servers as part of Auto Scaling
Scaling Plan
The first step in using Auto Scaling is to create a scaling plan. By using a scaling plan, you can configure and manage the scaling for the AWS resources you are going to use along with Auto Scaling. The scaling plan can be applied to all the supported Auto Scaling resources. The following sections outline the steps to create a scaling plan.
Identify Scalable Resources
You can automatically discover or manually choose the resources you want to use with your Auto Scaling plan. This can be done in three different ways:
• Search via CloudFormation stack You can select an existing AWS CloudFormation stack to have AWS Auto Scaling scan it for resources that can be configured for automatic scaling. AWS Auto Scaling only finds resources that are defined in the selected stack. It does not traverse through nested stacks. The stack must be successfully created and cannot have an operation in progress.
• Search by tag You can also use tags to find the following resources:
• Aurora DB clusters
• Auto Scaling groups
• DynamoDB tables and global secondary indexes
When you search by more than one tag, each resource must have all of the listed tags to be discovered.
• EC2 Auto Scaling groups You can choose one or more Auto Scaling groups to add to your scaling plan. The EC2 Auto Scaling is covered in detail in the next section. Figure 6-4 shows all the options for finding a scalable resource from the console.
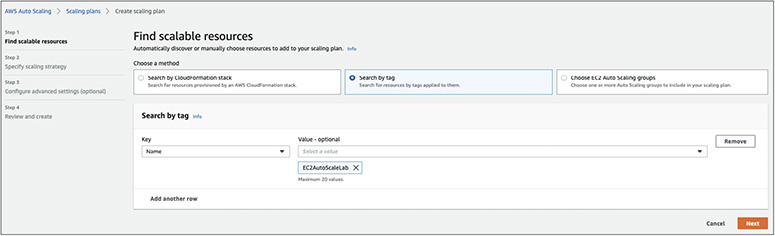
Figure 6-4 Finding a scalable resource
Specify Scaling Strategy
Once you identify the resource you are going to use with Auto Scaling, the next step is to specify a scaling strategy by which the resource will scale up and down. There are four different ways by which you can create a scaling strategy:
• Optimize for Availability When you choose this option, Auto Scaling automatically scales the resources in and out to make sure they are always available. When you choose this option, the CPU/resource utilization is kept at 40 percent.
• Balance Availability and Cost This option keeps a uniform balance between the availability and the cost. Here, the CPU/resource utilization is kept at 50 percent in order to maintain the perfect balance between the availability and cost.
• Optimize for Cost As the name suggests, the goal of this option is to lower the cost; hence, the CPU/resource utilization is kept at 70 percent. This feature is very useful for low-level environments where performance is not critical.
• Custom Scaling Strategy Using this option, you can choose your own scaling metric if the off-the-shelf strategy doesn’t meet your requirements. Here, you can decide your own CPU/resource utilization value. The various options related to scaling strategy from the AWS console are shown in Figure 6-5.
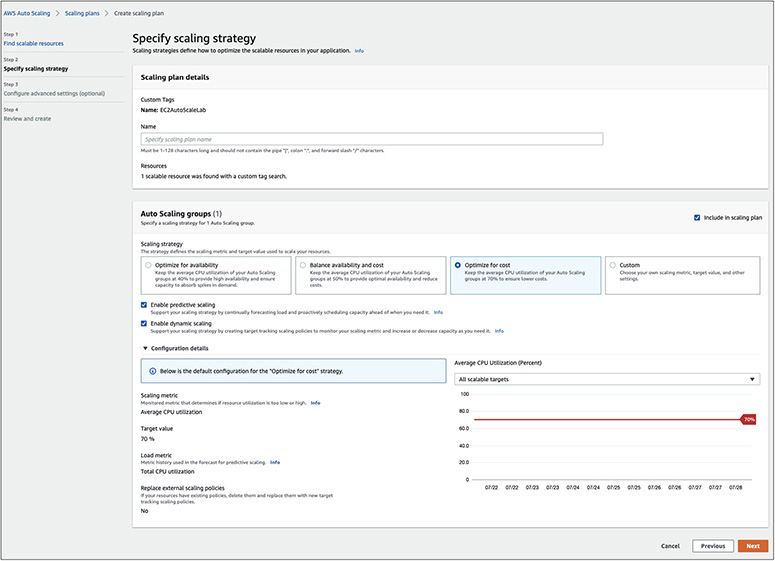
Figure 6-5 Choosing a scaling strategy

TIP As a solutions architect, you will be dealing with various kinds of workloads. You will notice that scaling strategies for one particular workload will be different from another workload. Therefore, you should experiment with scaling strategies for each workload and then come up with the correct one.
While choosing a scaling strategy, you can also enable predictive scaling and dynamic scaling. If you enable predictive scaling, machine learning is used to analyze the historical workload and then forecast the future workload. Predictive scaling makes sure you have the resource capacity provisioned before your application demands it. If you enable dynamic policy, target tracking scaling policies are created for the resources in your scaling plan. For example, via dynamic policy, you can define that the EC2 servers run at 60 percent of CPU. Then, whenever the CPU utilization rises above 60 percent, your scaling policy will be triggered. Thus, this scaling policy adjusts resource capacity in response to live changes in resource utilization.
Using EC2 Auto Scaling
Auto Scaling is most popular with EC2 instances. In this section, we are going to cover in detail how to set up Auto Scaling with an EC2 instance. The concepts for Auto Scaling we have discussed previously apply here as well. In the case of EC2 Auto Scaling, the resource is an EC2 server only. Let’s look in detail at all the steps required to use EC2 Auto Scaling. The first step in this process is to create a launch configuration.
Launch Configuration
When you use Auto Scaling to scale up your instances, it needs to know what kind of server to use. You can define this by creating a launch configuration. A launch configuration is a template that stores all the information about the instance, such as the AMI (Amazon machine image) details, instance type, key pair, security group, IAM (Identity and Access Management) instance profile, user data, storage attached, and so on.
Once you create a launch configuration, you can link it with an Auto Scaling group. You can use the same launch configuration with multiple Auto Scaling groups as well, but an Auto Scaling group always has only one launch configuration attached to it. You will learn about Auto Scaling groups in the next section. Once you create an Auto Scaling group, you can’t edit the launch configuration tied up with it; the only way to do this is to create a new launch configuration and associate the Auto Scaling group with the new launch configuration. The subsequent instances will be launched as per the new Auto Scaling group settings. For example, in your Auto Scaling group, say you have created a launch configuration with C4 large instances. You launch four C4 large instances as part of the initial launch. Then you remove the old configuration, create a new configuration, and add the new configuration as part of your Auto Scaling group. In your new configuration, you specify C4 extra-large instances. Now when the new instances are going to spin off, they will be C4 extra-large. Say the new Auto Scaling rule kicks in and the Auto Scaling group starts two more instances; the additional two new instances will be C4 extra-large. Now you will be running the fleet with four C4 large and two C4 extra-large instances. If one of the C4 large instances goes down because of a hardware fault, the replacement instance that the Auto Scaling group will launch will be a C4 extra-large and not C4 large since there is no entry of C4 large instances in the launch configuration anymore.

TIP You can save and reuse the launch configuration. (For example, you can use the launch configuration of the production environment for building a test environment.)
Auto Scaling Groups
An Auto Scaling group is the place where you define the logic for scaling up and scaling down. It has all the rules and policies that govern how the EC2 instances will be terminated or started. Auto Scaling groups are the collection of all the EC2 servers running together as a group and dynamically going up or down as per your definitions. When you create an Auto Scaling group, first you need to provide the launch configuration that has the details of the instance type, and then you need to choose the scaling plan or scaling policy. You can scale in the following ways:
• Maintaining the instance level This is also known as the default scaling plan. In this scaling policy, you define the number of instances you will always operate with. You define the minimum or the specified number of servers that will be running all the time. Auto Scaling groups make sure you are always running with that many instances. For example, if you define that you are always going to run six instances, whenever the instance goes down because of hardware failure or any issues, the Auto Scaling group is going to spin off new servers, making sure you are always operating with a fleet of six servers.
• Manual scaling You can also scale up or down manually either via the console or the API or CLI. When you do the manual scaling, you manually add or terminate the instances. Manually scaling should be the last thing you would be doing since Auto Scaling provides so many ways of automating your scaling. If you still scale it manually, you are defying the Auto Scaling setup.
• Scaling as per the demand Another usage of Auto Scaling is to scale to meet the demand. You can scale according to various CloudWatch metrics such as an increase in CPU, disk reads, disk writes, network in, network out, and so on. For example, you can have a rule that says if there is a spike of 80 percent and it lasts for more than five minutes, then Auto Scaling will spin off a new server for you. When you are defining the scaling policies, you must define two policies, one for scaling up and the other for scaling down.
• Scaling as per schedule If your traffic is predictable and you know that you are going to have an increase in traffic during certain hours, you can have a scaling policy as per the schedule. For example, your application may have heaviest usage during the day and hardly any activity at night. You can scale the application to have more web servers during the day and scale down during the night. To create an Auto Scaling policy for scheduled scaling, you need to create a scheduled action that tells the Auto Scaling group to perform the scaling action at the specified time.
To create an Auto Scaling group, you need to provide the minimum number of instances running at any time. You also need to set the maximum number of servers to which the instances can scale. In some cases, you can set a desired number of instances that is the optimal number of instances the system should be. Therefore, you tell Auto Scaling the following:
• If the desired capacity is greater than the current capacity, then launch instances.
• If the desired capacity is less than the current capacity, then terminate instances.
It is important that you know when the Auto Scaling group is increasing or decreasing the number of servers for your application. To do so, you can configure Amazon Simple Notification Service (SNS) to send an SNS notification whenever your Auto Scaling group scales up or down. Amazon SNS can deliver notifications as HTTP or HTTPS POST, as an e-mail, or as a message posted to an Amazon SQS queue.
There are some limits to how many Auto Scaling groups you can have. Since the number keeps on changing, it is recommended that you check the AWS web site for the latest numbers. All these numbers are soft limits, which can be increased with a support ticket.
Please note that an Auto Scaling group cannot span regions; it can be part of only one region. However, it can span multiple AZs within a region. By doing so, you can achieve a high-availability architecture.
It is recommended that you use the same instance type in an Auto Scaling group since you are going to have effective load distribution when the instances are of the same type. However, if you change the launch configuration with different instance types, all the new instances that will be started will be of different types.
Let’s talk about the scaling policy types in more detail. You can have three types of scaling policies.
Simple Scaling
Using simple scaling, you can scale up or down on the basis of only one scaling adjustment. In this mechanism, you select an alarm, which can be CPU utilization, disk read, disk write, network in or network out, and so on, and then scale up or down the instances on the occurrence of that particular alarm. For example, if the CPU utilization is 80 percent, you can add one more instance, or if the CPU utilization is less than 40 percent, you can take one instance down. You can also define how long to wait before starting or stopping a new instance. This waiting period is also called the cooldown period. When you create a simple scaling policy, you need to create two policies, one for scaling up or increasing the group size and another for scaling down or decreasing the group size. Figure 6-6 shows what a simple scaling policy looks like.

Figure 6-6 Simple scaling policy
If you look at Figure 6-6, you will notice the policy is executed when the alarm occurs, so the first step is to create an alarm. By clicking Add New Alarm, you can create a new alarm from where you can specify whom to notify and the scaling conditions. Figure 6-7 shows an alarm created that sends a notification to the admin when the CPU goes up by 50 percent after one occurrence of five minutes.
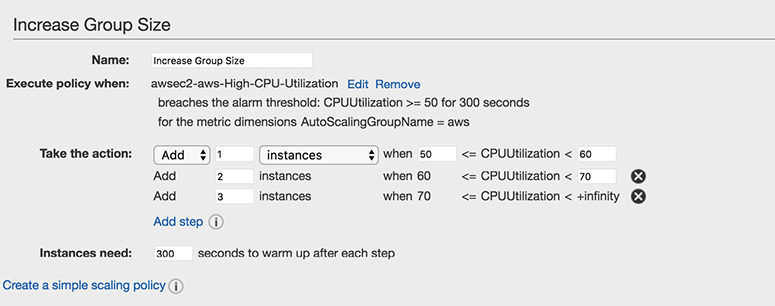
Figure 6-7 Creating an alarm
Once you create the alarm, you need to define the action that adds an EC2 instance for scaling up and decreases an EC2 instance for scaling down; then you input the time before the next scale-up or scale-down activity happens, as shown in Figure 6-8. If you look at the top of Figure 6-8, you will see that I have chosen from one to six instances; therefore, the maximum instances I can scale up to is six.
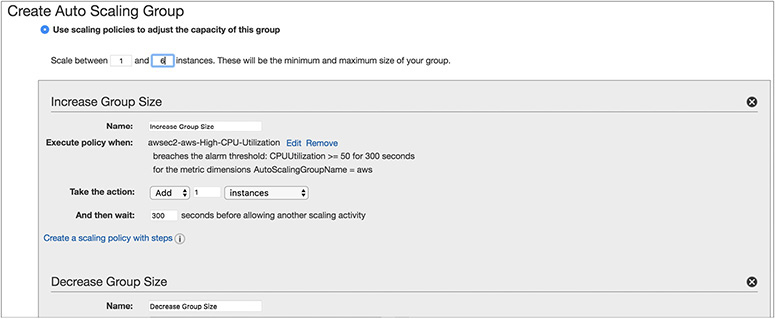
Figure 6-8 Simple scaling policy with all the parameters
Simple Scaling with Steps
With simple scaling, as we have discussed, you can scale up or down based on the occurrence of an event, and every time Auto Scaling does the same action. Sometimes you might need to have even finer-grained control. For example, let’s say you have defined a policy that says when the CPU utilization is more than 50 percent, add another instance. However, you can have even more control. Specifically, you can specify that when the CPU utilization is between 50 percent and 60 percent, add two more instances, and when the CPU utilization is 60 percent or more, add four more instances. If you want to do this kind of advanced configuration, simple scaling with steps is the solution. With simple scaling with steps, you do everything just like simple scaling, but in the end you add a few more steps. Figure 6-8 showed the option Creating A Scaling Policy With Steps. Once you click this, the Add Step button is enabled, and from there you can define the additional steps, as shown in Figure 6-9.

Figure 6-9 Simple scaling with steps
When you are doing the scaling up or down using simple scaling or simple scaling with steps, you can change the capacity in the following ways:
• Exact capacity You can provide the exact capacity to increase or decrease. For example, if the current capacity of the group is two instances and the adjustment is four, Auto Scaling changes the capacity to four instances when the policy is executed.
• Change in capacity You can increase or decrease the current capacity by providing a specific number. For example, if the current capacity of the group is two instances and the adjustment is four, Auto Scaling changes the capacity to six instances when the policy is executed.
• Percentage change in capacity You can also increase or decrease the current capacity by providing a certain percentage of capacity. For example, if your current capacity is 10 instances and the adjustment is 20 percent when the policy runs, Auto Scaling adds two more instances, making it a total of 12. Please note that since in this case it is a percentage, the resulting number will not always be an integer, and Auto Scaling will round off the number to the nearest digit. Values greater than 1 are rounded down. For example, 13.5 is rounded to 13. Values between 0 and 1 are rounded to 1. For example, .77 is rounded to 1. Values between 0 and –1 are rounded to –1. For, example, –.72 is rounded to –1. Values less than –1 are rounded up. For example, –8.87 is rounded to –8.
Target-Tracking Scaling Policies
You can configure dynamic scaling using target-tracking scaling policies. In this policy, either you can select a predetermined metric or you choose your own metric and then set it to a target value. For example, you can choose a metric of CPU utilization and set the target value to 50 percent. When you create a policy like this, Auto Scaling will automatically scale up or scale down the EC2 instances to maintain a 40 percent CPU utilization. Internally, Auto Scaling creates and monitors the CloudWatch alarm that triggers the Auto Scaling policy. Once the alarm is triggered, Auto Scaling calculates the number of instances it needs to increase or decrease to meet the desired metric, and it automatically does what you need.
Termination Policy
Auto Scaling allows you to scale up as well as scale down. When you scale down, your EC2 instances are terminated; therefore, it is important to shut down in a graceful manner so that you have better control. You can decide how exactly you are going to terminate the EC2 servers when you have to scale down. Say, for example, that you are running a total of six EC2 instances across two AZs. In other words, there are three instances in each AZ. Now you want to terminate one AZ. Since in this case the instances are pretty much balanced across these two AZs, terminating any one of them from any one of the AZs should be fine. If you have to terminate two instances, it is important to shut down instances from each AZ so that you can have a balanced configuration. It should not happen that you are going to terminate two servers from a single AZ; then you would have three servers running from one AZ and one server running from a second AZ, making it an unbalanced configuration.
You can configure termination policies to terminate an instance. The termination policy determines which EC2 instance you are going to shut down first. When you terminate a machine, it deregisters itself from the load balancer, if any, and then it waits for the grace period, if any, so that any connections opened to that instance will be drained. Then the policy terminates the instance.
There could be multiple ways you can write down termination policies. One way would be to determine what is the longest-running server you have in your fleet and then terminate it. The advantage of this is that since you’re running the server for the longest time, it may be possible the server might not have been patched, or there might be some memory leaks happening on the server and so on.
You can also terminate the servers that are close to billing an hour. By terminating these servers, you are going to extract the maximum benefit from the Auto Scaling feature. For example, if you have two servers and one of them has been running for just 5 minutes and another one has been running for around 54 minutes, terminating the one that has been running for 54 minutes gives you more value for the money.

NOTE AWS has now moved to a new billing model that is based on paying per second for certain instance types along with paying per hour. You should be aware of both concepts.
You can also terminate the oldest launch configuration. If you are running servers with some older version of AMIs and you were thinking of changing them, then it makes sense to get rid of the launch configuration and create a new launch configuration with the latest version of AMIs. Of course, if you remove the launch configuration, there is no impact on the running servers; only the new servers are going to reflect the change.
Elastic Load Balancing
As you are probably aware, in an on-premise environment, the load balancer is a physical hardware that is responsible for routing the traffic and balancing the workload across multiple servers. Many applications use a load balancer in front of web servers to route the traffic, balance the workload, and provide the elasticity. But it is often seen that sometimes the load balancer itself becomes a single point of failure. What happens when your physical load balancer fails? Of course, the underlying application goes down until the load balancer is replaced. Also, there are some additional challenges for managing the traditional load balancer. For example, you need to manually add or remove a server from the load balancer. The traditional load balancer is not capable of adding a new server dynamically if the traffic goes up. AWS Elastic Load Balancing is a fully managed service that solves all these problems for you. Elastic Load Balancing automatically distributes incoming application traffic across the multiple applications, microservices, and containers hosted on Amazon EC2 instances.
These are the advantages of Elastic Load Balancing:
• Elastic The biggest advantage of ELB is it is automatically scalable. You don’t have to do anything manually when you are adding or deleting the instances; there is no manual intervention at all. In the traditional on-premise environment, when you deploy a load balancer you always have to configure it manually. For example, if you’re planning to hook up the load balancer to ten different servers, you have to configure every server with the load balancer. Similarly, when you have to take a server down from the load balancer, you need to do that manually.
• Integrated ELB is integrated with various AWS services. As discussed previously in this chapter, ELB’s integration with Auto Scaling helps to scale the EC2 instances and workload distribution. The integration plays a vital role since ELB and Auto Scaling are integrated; therefore, whenever a new server is started by Auto Scaling, it automatically gets registered with Elastic Load Balancing, and whenever the instance is terminated by Auto Scaling, it gets deregistered with Elastic Load Balancing. ELB can also be integrated with CloudWatch from where it gets all the metrics and decides whether to take an instance up or down or what other action to take. ELB can also be integrated with Route 53 for DNS failover.
• Secured ELB provides a lot of security features such as integrated certificate management and SSL decryption, port forwarding, and so on. These days, web site operators are expanding encryption across their applications and are often using HTTPS by default to secure all web traffic. ELB is capable of terminating HTTPS/SSL traffic at the load balancer to avoid having to run the CPU-intensive decryption process on their EC2 instances. This can also help in mitigating a DDoS attack. In addition to this, ELB provides lots of predefined security policies that you can directly use. Just like an EC2 instance, you can also configure security groups for ELB that allows you to control incoming and outgoing traffic for ELB.
• Highly available ELB helps you to create the most highly available architecture. Using ELB you can distribute the traffic across Amazon EC2 instances, containers, and IP addresses. Using Elastic Load Balancing, you can deploy applications across multiple AZs and have ELB distribute the traffic across the multiple AZs. By doing this, if one of the AZs goes down, your application continues to run.
• Cheap ELB is cheap and cost-effective. If you have to deploy a load balancer in your own premises or even if you’re planning to deploy a load balancer across multiple EC2 servers, it is going to cost you a lot. You also save some money on hiring people since a lot of stuff can be automated; for example, Auto Scaling saves network administrators a lot of time.
How ELB Works
Let’s understand how a load balancer works. You might be wondering how a load balancer offers high availability. Is there a possibility of ELB going down? Internally, every single Elastic Load Balancing instance utilizes multiple AZs. Even if you do not deploy your application or workload across multiple AZs (which is always recommended), the load balancers that you are going to use will be always deployed across multiple AZs.
In Figure 6-10, you will notice that in the customer VPC, the EC2 instances are deployed in two different AZs. The customer also hooked up an ELB with both the EC2 instances. Internally, there will be multiple load balancers deployed in a separate ELB VPC, spanning multiple AZs to provide a highly available architecture. This part will be transparent to you; you don’t have to do anything to configure the high availability for the load balancer. AWS will manage everything for you automatically, and there is no separate charge for that. As a result, you get highly available load balancers with zero overhead of manageability.

Figure 6-10 High availability for ELB
Types of Load Balancers
There are three main load balancers that you can leverage using Amazon Web Services, covered next.
Network Load Balancer
The network load balancer (NLB), or the TCP load balancer, acts in layer 4 of the OSI model. This is basically a connection-based load balancing model. It can handle connections across Amazon EC2 instances, containers, and IP addresses based on IP data. In all cases, all the requests flow through the load balancer; then the load balancer handles those packets and forwards them to the back end as they are received. It does not look inside the packets. It supports both TCP and SSL. In a network load balancer, the client connection is always bound to a server connection, which means whenever a request comes, it will always be bound to a back-end instance. There is no header modification done, which means the load balancer does not make any changes or touch the packet. The network load balancer preserves the client-side source IP address, allowing the back end to see the IP address of the client. There are no X-Forwarded-For headers, proxy protocol prepends, source or destination IP addresses, or ports to request.
Application Load Balancer
The application load balancer (ALB) works on layer 7 of the OSI model. It supports HTTP and HTTPS. Whenever a package comes from an application, it looks at its header and then decides the course of action. The connection is terminated at the load balancer and pooled to the server. Multiple connections are opened in the server, and whenever the load balancer receives the requests, it forwards them using the connection pool. In the case of an application load balancer, the headers might be modified. For example, a header might be inserted, such as the X-Forwarded-For header containing the client IP address. The ALB is capable of doing content-based routing, which means if your application consists of multiple services, it can route to a specific service as per the content of the request. You can also do host-based routing, where you route a client request based on the Host field of the HTTP header, and path-based routing, where you can route a client request based on the URL path of the HTTP header.
Classic Load Balancer
The classic load balancer supports the classic EC2 instances. It supports both network and application load balancing. In other words, it operates on layer 4 as well as on layer 7 of the OSI model. If you are not using the classic EC2 instances, then you should use either an application or a network load balancer depending on your use case.
The X-Forwarded-For request header helps you identify the IP address of a client when you use an HTTP or HTTPS load balancer. Because load balancers intercept traffic between clients and servers, your server access logs contain only the IP address of the load balancer. To see the IP address of the client, use the X-Forwarded-For request header. Elastic Load Balancing stores the IP address of the client in the X-Forwarded-For request header and passes the header to your server.
Table 6-1 compares the features of all three types of load balancers.

Table 6-1 Comparison of the Three Types of Load Balancers
You can configure a load balancer to be either external facing or internal facing. When the load balancer is accessed from the Internet, it is called an external load balancer. When the load balancer does not have any Internet access and rather is used internally, say to load balance a couple of instances running on a private subnet, then it is called an internal load balancer. Load balancers in EC2-Classic are always Internet-facing load balancers. When you create a load balancer within a VPC, you can either make it external facing or internal facing. To create an external-facing load balancer, you need to create it within the public subnet, and to create an internal-facing load balancer, you need to configure it for the private subnet.

TIP Whenever you are creating an external load balancer, you should pay upmost attention to its security since you are exposing the load balancer to the external world.
Load Balancer Key Concepts and Terminology
As discussed previously, the load balancers are fully managed, scalable, and highly available. The application load balancer supports content-based routing; therefore, the biggest benefit from it is that it allows for multiple applications to be hosted behind a single load balancer. Let’s see an example to understand this. In a classic load balancer, you can host only one application per ELB. If you wanted to host multiple applications, you had to use DNS. Say you have an application that takes care of all the orders on your web site, and you have another application that takes care of all the images of your web site. In this case, you would hook up two load balancers: one for the orders and another for the images. Then you use DNS to resolve. So, when you go to orders.example.com from a web browser, the DNS routes it to the application hosting the orders, and when you go to images.example.com in your browser, the application routes it to the application hosting the images. In this case, you have managed to load balance, as well as pay for two separate load balancers. See Figure 6-11.

Figure 6-11 Using two different load balancers for two applications
Now with the application load balancer in the same example, if you have orders in part of example.com, the load balancer does path-based routing, and it will reroute the traffic to the application hosting the orders. Similarly, if you have images in the path, it will route you to the application hosting the images. So, you are not using multiple load balancers here; rather, you are using just one load balancer and routing it to the respective application using path-based routing. This is shown in Figure 6-12.

Figure 6-12 Using one load balancer for different applications
Using path-based routing, you can have up to ten different sets of rules, which means you can host up to ten applications using one load balancer. The biggest benefit of this is you are paying only for one load balancer instead of ten, and of course you’re managing only one load balancer.
The application load balancer provides native support for microservice and container-based architectures. Instances can be registered with multiple ports, allowing for requests to be routed to multiple containers on a single instance. In the case of classic EC2, you register an instance with the load balancer with an API. If you try to re-register that instance again, the system tells you that the instance is already registered and cannot be registered. With the application load balancer, you can register an instance with different ports multiple times. This is really helpful when you are running a container-based application because containers often give dynamic ports, and you can register any of the ports with an application load balancer. If you use Amazon ECS, it takes care of the register tasks automatically with the load balancer using a dynamic port mapping. Even if you are running a container but running multiple applications in multiple ports, you can register all of them in the load balancer since the port is different. You can even balance the load across multiple containers as well as across multiple EC2 instances using the application load balancer. Also, if you use containers instead of EC2 instances, you save more in terms of cost because for many of the use cases, you may not need a T2 micro instance; you can save the CPU cycles and don’t have to pay for it. This is shown in Figure 6-13.

Figure 6-13 Load balancing across EC2 and ECS
Now let’s understand the core components of the load balancer.
Listeners
Listeners define the protocol and port on which the load balancer listens for incoming connections. Each load balancer needs at least one listener to accept incoming traffic and can support up to ten listeners. You can define all the routing rules on the listener. In the previous example of routing, where you used path-based routing, the routing was defined in the listener. For application load balancing, the listener supports the HTTP and HTTPS protocols, and for a network load balancer, the listener supports the TCP protocol. For both ALB and NLB, the ports between 1 and 65535 are supported. You can use WebSockets with your HTTP, HTTPS, and TCP listeners. Application load balancers also provide native support for HTTP/2 with HTTPS listeners. Using one HTTP/2 connection, you can send up to 128 requests in parallel. The load balancer converts these to individual HTTP/1.1 requests and distributes them across the healthy targets in the target group using the round-robin routing algorithm.
Target Groups and Targets
The target groups are logical groupings of targets behind a load balancer. Target groups can exist independently from the load balancer. You can create a target group and keep it ready; you can keep on adding resources to the target group and may not immediately add it with the load balancer. You can associate it with a load balancer when needed. The target groups are regional constructs, which means you can allocate resources from only one region in a target group. The target group can be associated with the Auto Scaling group as well.
The target is a logical load balancing target, which can be an EC2 instance, microservice, or container-based application for an application load balancer and instance or an IP address for a network load balancer. When the target type is IP, you can specify IP addresses from one of the following CIDR blocks:
• The subnets of the VPC for the target group
• 10.0.0.0/8 (RFC 1918)
• 100.64.0.0/10 (RFC 6598)
• 172.16.0.0/12 (RFC 1918)
• 192.168.0.0/16 (RFC 1918)
EC2 instances can be registered with the same target group using multiple ports. A single target can be registered with multiple target groups.
Rules
Rules provide the link between listeners and target groups and consist of conditions and actions. When a request meets the condition of the rule, the associated action is taken. Rules can forward requests to a specified target group. In the previous example, you use a rule whenever you see an image in the path and route it to the application hosting the image. This is called a path-based rule. Whenever you do a path-based rule, the conditions have to be specified in the path pattern format. A path pattern is case sensitive, can be up to 128 characters in length, and can contain any of the following characters:
• A–Z, a–z, 0–9
• _ – . $ / ~ ” ‘@ : +
• & (using &)
• (matches zero or more characters)
• ? (matches exactly one character)
When you create a listener by default, it has a rule; however, you can add more rules. The default rule does not have any conditions attached to it. Each rule has a priority attached to it.
The rule with the highest priority will be executed first, and the one with the lowest priority will be executed at the end. The default rule has the lowest-priority value; hence, it is evaluated last. Currently, the rule supports only one kind of action, which is forward; this forwards requests to the target group. There are two types of rule conditions: host and path. When the conditions for a rule are met, then its action is taken.
As of the writing of this book, load balancers can support up to ten rules. Support for 100 rules is on the road map of AWS.
Figure 6-14 shows the relationship between the listeners, target groups, targets, and rules.

Figure 6-14 Relationship between listeners, target groups, targets, and rules
Health Check
When you consider a load balancer, you want to make sure the application it supports is highly available. To do so, you need to run a health check, which is going to check the target or target group at a certain interval of time defined by you to make sure the target or the target group is working fine. If any of the targets have issues, then health checks allow for traffic to be shifted away from the impaired or failed instances. For example, if your load balancer is hooked up to four EC2 instances and one of them has a spike in CPU usage, the health check will keep on failing. When this happens, the instance will be taken off the load balancer, and all the traffic will be redirected to a different EC2 instance. If the server becomes healthy, the health check will pass, and the load balancer will redirect the traffic to that instance. If the server does not become healthy and the health check keeps on failing, then it will be replaced by a new EC2 instance.
For the interval at which the load balancer sent a check request switch, the target is called HealthCheckIntervalSeconds. With the health check request, you specify the port, protocol, and ping path. If the target responds before the response times out, the shell check is successful. If it does not respond and exceeds the threshold for consecutive failed responses, the load balancer marks it as a failure and takes the target out of service. You can customize the frequency, failure thresholds, and list of successful response codes. If there is a failure, then the detailed reasons for health check failures are now returned via the API and displayed in the AWS Management Console.
The application load balancer supports HTTP and HTTPS health checks, whereas the network load balancer supports TCP health checks.
The results of the health check can have the possible values shown in Table 6-2.

Table 6-2 Various Health Check Statuses
Using Multiple AZs
Whenever you’re building an application with Auto Scaling and ELB, it is recommended that you use multiple AZs whenever possible. This helps you craft a highly available architecture. Since ELB can distribute the traffic equally across multiple AZs, then why not leverage this feature and get the best out of the AWS ecosystem? Internally ELB always runs from multiple AZs, so even if one of the AZs goes down, there won’t be any impact to Elastic Load Balancing since the traffic will be routed via a load balancer sitting in a different AZ. The DNS will route the traffic via a different AZ. So, if your application sits on only one AZ, if the AZ goes down, your application will fail but not the ELB. Figure 6-15 shows the routing of the ELB traffic via a different ELB.

Figure 6-15 Routing of ELB via a different AZ
Now let’s see an example when you run your application on a single AZ or on multiple AZs. So, you have an application that is running on six servers; if you run this application from a single AZ and it goes down, then your application goes down.
If you run this application from two different AZs, then you could be running three servers from each AZ. Now if one of the AZs goes down, you lose 50 percent of the capacity. In that case, you can quickly use Auto Scaling to spin off the new instance. In some cases, it can be possible that you are running a critical application and you cannot even afford to lose 50 percent of the capacity. In that case, you will provision six servers on each AZ to make sure even if one of the AZs goes down you are running with 100 percent of the capacity.
Now let’s say you are going to use three different AZs to build your application. In this case, you will be running two instances from each AZ. Now if one of the AZs goes down, you will lose 33 percent of the resources, which means you are going to lose only two servers. In the same scenario of high availability, where you cannot afford to have any downtime, you are going to provision three servers at each AZ, so in the event of one of the AZs going down, you still will be running with six instances. In this scenario, you are deploying 9 servers across three AZs, whereas in the previous scenario of two AZs, you have to deploy 12 servers across two AZs. So, sometimes deploying the applications in more AZs ends up being cheaper, as shown in Figure 6-16.

Figure 6-16 Single AZ vs. two AZs vs. three AZs

NOTE When you dynamically scale up or scale down, it is important to maintain the state information of the session. If you maintain that in the EC2 servers and that server goes down, you lose all the information. If you maintain the session information in the EC2 server and even one user is connected with that EC2 server, you can’t take it down. Therefore, it is recommended you maintain the state information outside the EC2 servers so that Auto Scaling can dynamically scale up and down the EC2 servers. DynamoDB is a great way to maintain the session state that you should consider while designing the architecture.
Sometimes using multiple AZs may have some issues or challenges such as if you are using a Java-based application. Often the application caches the server IP address in the DNS, and as a result, it redirects the traffic to the same instance every time. This causes an imbalance in the instance capacity since the proper load distribution does not happen. Cross-zone load balancing solves that problem.
Cross-zone load balancing distributes the requests evenly across multiple availability zones. Cross-zone load balancing is enabled by default in an application load balancer, and you don’t have to do anything manually to configure it. If you are using a classic load balancer, you need to configure this manually if you are using an API or CLI to create the load balancer. If you are using the console to create the classic load balancer, this option is selected by default. With network load balancers, each load balancer node distributes traffic across the registered targets in its availability zone only. Moreover, there is no additional bandwidth charge for cross-zone traffic, so you don’t have to pay anything extra for the data transfer across multiple AZs. This is useful when you are using ALB across multiple AZs.
Please note the cross-zone load balancing happens across the targets and not at the AZ level. Let’s see an example to understand this. Say you have an imbalanced configuration with one instance running in one AZ and three instances running in the second AZ, and you have hooked up an ALB with both the AZs across all the four targets (instances). Now with cross-zone load balancing, the workload will be distributed equally across the four instances and not equally within the two AZs. This ensures that all the instances you have get an equal share of work.
In the case of the application load balancer, when the load balancer receives a request, it checks the priority order from the listener rule to determine which rule to apply. Once it decides which rule to apply, it selects a target from the target group and applies the action of the rule using a round-robin algorithm. The routing is performed independently for each target group, and it doesn’t matter if the target is registered with multiple target groups.
In the case of a network load balancer, the load balancer receives a request and selects a target from the target group for the default rule using a flow hash algorithm, based on the protocol, source IP address, source port, destination IP address, and destination port. This provides session stickiness from the same source to the same destination for the traffic. With a sticky session, you can instruct the load balancer to route repeated requests to the same EC2 instance whenever possible. The advantage of this is that the EC2 instance can cache the user data locally for better performance.
With classic load balancers, the load balancer node that receives the request selects the least outstanding request’s routing algorithm for HTTP and HTTPS listeners and selects a registered instance using the round-robin routing algorithm for TCP listeners.
Lab 6-1: Set Up Auto Scaling
In this lab, you will be doing the following:
• Create a launch configuration
• Create an Auto Scaling group
• Configure Auto Scaling notifications that are triggered when instance resources become too high or too low
• Create policies to scale up or scale down the number of currently running instances in response to changes in resource utilization
1. Log in to the AWS console and select the desired region where you want to want your instances to be started.
2. From the Services main page, select EC2.
3. In the menu on the left, scroll down until you see Auto Scaling.
4. Click Launch Configurations and then click Create Auto Scaling Group.

5. You will see this option if you have not created any Auto Scaling group previously. If you created an Auto Scaling group earlier, clicking Launch Configurations will take you to a screen where you need to click Create Launch Configuration.
6. Click Create Launch Configuration.

7. The Create Launch Configuration screen will be displayed.

8. Select the AMI from where your EC2 instances will be started. Select Amazon Linux AMI, and on the next screen choose the t2.micro instance since it belongs to the free tier.
9. On the next screen, you need to provide the name of the launch configuration. Choose a unique name for your launch configuration. In this example, the name is AWS SA Book. Leave all other fields at the defaults and click Next. The next few screens will be exactly like that of creating an EC2 instance. You need to provide all the other details such as adding storage, configuring the security group, and so on. After providing all the details, click Create Launch Configuration.

10. The system will prompt you to download the keys. If you already have a key pair, you can reuse it, or you can create a new one from this screen and then download it.
11. The system will now prompt you to create the Auto Scaling group. You need to provide the unique group name and group size (which is the number of instances the group should have at any time); this is also known as the desired capacity. For this example, enter 2 as the value for Start With x Instances. In the Network field, put the VPC name where you want this Auto Scaling group to run, and in the Subnet field, put the subnet details where you want the EC2 instances to be launched. In this example, I have chosen two different subnets across two different AZs. This is important because this is how you run the EC2 instances across multiple AZs using Auto Scaling.

12. The next step is to configure the scaling policies. In this case, you will create a simple scaling policy. Select the option Use Scaling Policies to adjust the capacity of this group. Click Create A Simple Scaling Policy. For the option Scale Between x And x Instances, choose between 2 and 4. This will be the minimum size and maximum size of your group.
13. Create an alarm, as shown in Figure 6-7, for both scaling up and scaling down policies.
14. Now you need to create the two scaling policies. First, create the scaling up policy, and then create the scaling down policy. For increasing the group size, choose CPU as a metric and use a number greater than or equal to 60 percent CPU utilization. Set to add one instance and wait for 300 seconds before allowing another scaling activity. Similarly, create another policy for scaling down, choose the metric CPU, and select less than or equal to 20 percent, and set the action of removing an instance.
15. The next step is to add a notification. In the field Send A Notification Topic, enter the topic Auto Scale test. For these recipients, put your e-mail address, and select all the check boxes: Launch, Terminate, Fail To Launch, and Fail To Terminate. Click Next.

16. Now configure the tags. By using the tags, you should be able to uniquely identify the EC2 instances created by Auto Scaling. In the Key field, type the name, and in the Value field type EC2AutoScaleLab.
17. Click Review. This screen will show you all the options you have chosen. If it looks good, click Create Auto Scaling Group.

18. Once you click Create Auto Scaling Group, your Auto Scaling group will be created for you and will start two EC2 instances as part of the initial group.
19. Now log in to both instances and run the following command, which will increase your CPU, from the terminal:

20. Open another terminal and monitor using the top command. Once the CPU has spiked, keep monitoring your console. You will see that another EC2 instance will be started by the Auto Scaling group. Also, the moment the CPU spikes up to 60 percent, you will get an e-mail alert that the CPU is more than 60 percent. Similarly, you will get another e-mail notification when Auto Scaling has launched another instance. Now kill the command, and the CPU will go down. Observe from the console that Auto Scaling is going to shut down a server for you, and again you will get an e-mail notification.
Chapter Review
In this chapter, you learned that Auto Scaling is the technology that allows you to scale your workload automatically up and down based on the rules you define. Auto Scaling can be integrated with various AWS services. The most popular use case is with EC2. To use Auto Scaling for an EC2 instance, you need to create a launch configuration, which stores all the information about the instance such as the AMI details, instance type, key pair, security group, IAM instance profile, user data, storage attached, and so on. Then you create an Auto Scaling group, where you define the logic for scaling up and scaling down. It has all the rules and policies that govern how the EC2 instances will be terminated or started. To create an Auto Scaling group, you also need to define the minimum and maximum EC2 instances.
There are three types of scaling policies that you can have:
• Simple scaling Using simple scaling, you can scale up or down on the basis of only one scaling adjustment. In this mechanism, you select an alarm, which can be either CPU utilization, disk read, disk write, network in, network out, and so on.
• Simple scaling with steps With simple scaling with steps, you do everything just like simple scaling, but in the end you add a few more steps.
• Target-tracking scaling policy In this policy, either you can select a predetermined metric or you choose your own metric and then set it to a target value. For example, you can choose the metric CPU utilization and set the target value to 50 percent.
You also learned about Elastic Load Balancing. Elastic Load Balancing balances the workload across multiple EC2 instances. There are three main load balancers you can leverage using Amazon Web Services:
• Network load balancer This is also known as a TCP load balancer. It acts in layer 4 of the OSI model. This is basically a connection-based load balancing model.
• Application load balancer The application load balancer works on layer 7 of the OSI model. It supports HTTP and HTTPS.
• Classic load balancer The classic load balancer supports the classic EC2 instances.
Questions
1. Where do you define the details of the type of servers to be launched when launching the servers using Auto Scaling?
A. Auto Scaling group
B. Launch configuration
C. Elastic Load Balancer
D. Application load balancer
2. What happens when the Elastic Load Balancing fails the health check? (Choose the best answer.)
A. The Elastic Load Balancing fails over to a different load balancer.
B. The Elastic Load Balancing keeps on trying until the instance comes back online.
C. The Elastic Load Balancing cuts off the traffic to that instance and starts a new instance.
D. The load balancer starts a bigger instance.
3. When you create an Auto Scaling mechanism for a server, which two things are mandatory? (Choose two.)
A. Elastic Load Balancing
B. Auto Scaling group
C. DNS resolution
D. Launch configuration
4. You have configured a rule that whenever the CPU utilization of your EC2 goes up, Auto Scaling is going to start a new server for you. Which tool is Auto Scaling using to monitor the CPU utilization?
A. CloudWatch metrics.
B. Output of the top command.
C. The ELB health check metric.
D. It depends on the operating system. Auto Scaling uses the OS-native tool to capture the CPU utilization.
5. The listener within a load balancer needs two details in order to listen to incoming traffic. What are they? (Choose two.)
A. Type of operating system
B. Port number
C. Protocol
D. IP address
6. Which load balancer is not capable of doing the health check?
A. Application load balancer
B. Network load balancer
C. Classic load balancer
D. None of the above
7. If you want your request to go to the same instance to get the benefits of caching the content, what technology can help provide that objective?
A. Sticky session
B. Using multiple AZs
C. Cross-zone load balancing
D. Using one ELB per instance
8. You are architecting an internal-only application. How can you make sure the ELB does not have any Internet access?
A. You detach the Internet gateway from the ELB.
B. You create the instances in the private subnet and hook up the ELB with that.
C. The VPC should not have any Internet gateway attached.
D. When you create the ELB from the console, you can define whether it is internal or external.
9. Which of the following is a true statement? (Choose two.)
A. ELB can distribute traffic across multiple regions.
B. ELB can distribute across multiple AZs but not across multiple regions.
C. ELB can distribute across multiple AZs.
D. ELB can distribute traffic across multiple regions but not across multiple AZs.
10. How many EC2 instances can you have in an Auto Scaling group?
A. 10.
B. 20.
C. 100.
D. There is no limit to the number of EC2 instances you can have in the Auto Scaling group.
Answers
1. B. You define the type of servers to be launched in the launch configuration. The Auto Scaling group is used to define the scaling policies, Elastic Load Balancing is used to distribute the traffic across multiple instances, and the application load balancer is used to distribute the HTTP/HTTS traffic at OSI layer 7.
2. C. When Elastic Load Balancing fails over, it is an internal mechanism that is transparent to end users. Elastic Load Balancing keeps on trying, but if the instance does not come back online, it starts a new instance. It does not wait indefinitely for that instance to come back online. The load balancer starts the new instance, which is defined in the launch configuration. It is going to start the same type of instance unless you have manually changed the launch configuration to start a bigger type of instance.
3. B, D. The launch configuration and the Auto Scaling group are mandatory.
4. A. Auto Scaling relies on the CloudWatch metrics to find the CPU utilization. Using the top command or the native OS tools, you should be able to identify the CPU utilization, but Auto Scaling does not use that.
5. B, C. Listeners define the protocol and port on which the load balancer listens for incoming connections.
6. D. All the load balancers are capable of doing a health check.
7. A. Using multiple AZs, you can distribute your load across multiple AZs, but you can’t direct the request to go to the same instance. Cross-zone load balancing is used to bypass caching. Using one ELB per instance is going to complicate things.
8. D. You can’t attach or detach an Internet gateway with ELB, even if you create the instances in a private subnet; and if you create an external-facing ELB instance, it will have Internet connectivity. The same applies for VPC; even if you take an IG out of the VPC but create ELB as external facing, it will still have Internet connectivity.
9. B, C. ELB can span multiple AZs within a region. It cannot span multiple regions.
10. D. There is no limit to the number of EC2 instances you can have in the Auto Scaling group. However, there might an EC2 limitation in your account that can be increased by logging a support ticket.