In this chapter, you will • Be introduced to IAM • Learn about different types of security credentials • Understand users, groups, and roles • Learn some IAM best practices • Take a look at AWS platform compliance • Understand the shared security model AWS Identity and Access Management (IAM) allows you to control individual (users) and group access to all the AWS resources in a secured way. Using IAM, you can define what each user can access in the AWS cloud. For example, you can specify which users have administrator access, which users have read-only access, which users can access certain AWS services, and so on. Using the IAM service, you can choose the services that specific users are going to use and what kind of privileges users should have. In a nutshell, you control both authentication and authorization on the AWS resources through identity and access management, which means IAM is about whether you are really who you say you are as well as what you are authorized or allowed to do. In addition, you can audit and log the users, continuously monitor them, and review account activity. Authentication is about making sure you are who you say you are. IAM offers the following authentication features: • Managing users and their access You can create and manage users and their security such as access keys, passwords, and multifactor authentication. You can also manage the permissions for a user and thus get granular control over what operations the user can perform. • Managing federated users and their access Using IAM, you can manage federated users. In simplest terms, federation is about checking with a trusted third party to confirm your identity. Using federation you can use single sign-on (SSO) to access the AWS resources using the credentials of your corporate directory. AWS supports Security Assertion Markup Language (SAML) as well as non-SAML-based options such as AWS Directory Service for Microsoft Active Directory to exchange identity and security information between an identity provider (IdP) and an application. Using an IdP, you don’t have to manage your own user identities or create custom sign-in code. An IdP does that for you. Your external users sign in through a well-known identity provider, such as Login with Amazon, Facebook, Google, and many others, and you can give those external identities permissions to use AWS resources in your account. IAM is about making sure you’re only able to do what you’re authorized to do. Using IAM, you can authorize with granularity who can do what. IAM is a system that first is assigned to all AWS services. Every time a service is set up, like an EC2 instance database, it is created with access rules that decide which users and what operations are allowed on it. Therefore, you can implement the concepts of least privilege and segregation of duties. In AWS, authorization is mainly done using IAM policies. An IAM policy is a piece of code written in JavaScript Object Notation (JSON) where you can define one or more permissions. These permissions define which resources and which actions or operations the IAM entity is allowed. This policy can be attached to any IAM entity such as a user, group, or role. The policy defines what actions an IAM entity can take, which resources to use, what the effect will be when the user requests access to a resource, and so on. By using an IAM policy, you can get fine-grained access control for any IAM entity, and you can attach any number of policies to an entity. A policy can even be attached to multiple entities. If you want to give Amazon S3 read-only access to your developers, then you can create a policy called S3RO and attach all the developers to this policy. Alternatively, if all your developers are part of a particular group (which is typical), attach the IAM policy to that group only. By doing that, you won’t have to manually attach the policy to every developer account individually. A policy looks something like this: If you look at the policy, you will find that by attaching this policy to a user, the user is going to have read-only access to S3, which means the user can view the bucket and get an object from the bucket but can’t upload or put anything in the bucket. Using a policy, you can either allow or deny access to any resource for any IAM entity. When you create a user, there are no default permissions; all the permissions need to be explicitly given. In other words, all permissions are implicitly denied by default, which means unless you explicitly allow a permission, the IAM entity won’t have access to anything. Of course, if you explicitly deny something, it will always be denied. Figure 5-1 shows how IAM determines permissions.
CHAPTER 5
Identity and Access Management and Security on AWS
Authentication
Authorization
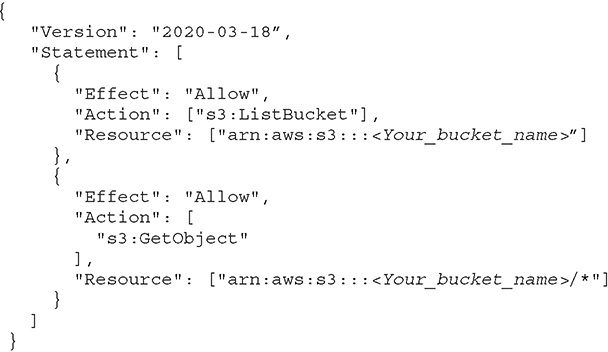
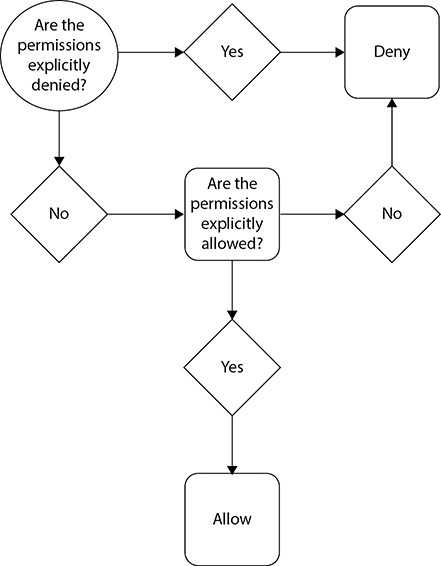
Figure 5-1 How AWS IAM determines permissions
Auditing
AWS offers you tools that can help you with auditing. Auditing is about ensuring and proving compliance with company rules and strict regulatory guidelines. It is also about making sure only authorized persons make requests and that all the requests are legitimate. The AWS CloudTrail service records activity made on your account and delivers log files to your Amazon S3 bucket. You can access these logs directly from the console or via the command-line interface (CLI) and process them via some of the popular third-party tools like Splunk, SumoLogic, AlertLogic, Loggly, and DataDog. CloudTrail provides visibility into user activity by recording actions taken on your account. CloudTrail can log every API call and related event made. CloudTrail records important information about each action, including the following:
• Who made the request?
• When was the request made?
• What was the request about?
• Which resources were acted upon in response to the request?
• Where was the request made from and made to?
This information helps you to track changes made to your AWS resources and to troubleshoot operational issues. CloudTrail makes it easier to ensure compliance with internal policies and regulatory standards.
Types of Security Credentials
When you work with the AWS ecosystem, you can have various types of security credentials. It all depends on how you interact with the AWS ecosystem. For example, when you log in to the AWS console, you can use a combination of usernames and passwords, whereas when you log in to an Amazon EC2 environment, you use a key pair. These are the security credentials you are often going to use:
• IAM username and password This will be used mainly for accessing the AWS Management Console.
• E-mail address and password This is associated with your root account.
• Access keys This is often used with the CLI, APIs, and SDKs.
• Key pair This is used with Amazon EC2 for logging in to the servers.
• Multifactor authentication This is an additional layer of security that can be used with the root account as well.
Temporary Security Credentials
In addition to these types of security credentials, AWS offers temporary security credentials. These security credentials are short-term and should never be used for long-term purposes. They can be configured to last for a few minutes to a few hours. Once the credentials expire, you won’t be able to use them. If you are using these temporary credentials via an API, once they expire, AWS won’t recognize the API or allow access when an API request is made with the security credentials.
The temporary security credentials work exactly like the long-term credentials; they are just short-lived. If you want to create and provide the temporary security credentials to your set of trusted users to control some of the AWS resources, you can use the AWS Security Token Service (AWS STS). These temporary security credentials won’t be stored with a user; rather, they will be dynamically generated whenever a user requests them.
Temporary security credentials offer lots of advantages since they are short-lived and expire automatically; therefore, you can provide access to your AWS resources to users without having to define an AWS identity for them. Moreover, you do not have to distribute or embed long-term or permanent AWS security credentials with an application.
By using IAM, you can create users and groups and then assign permissions to the users using the least privilege principle. Let’s first understand users, groups, and roles in detail.
Users
To log in to a laptop or an operating system, you need a username and password. Similarly, to use the AWS service, you need a user through which you log in to AWS and start working. A user can be an actual physical user, or it can be an application that needs access to the AWS service. Thus, you can say that an IAM user is an entity that you create in AWS to uniquely represent a person or a service; this entity interacts with AWS to do day-to-day work with AWS. An IAM user has a username and credentials. Whenever an IAM user is created, the user does not have any permission to do anything unless explicit permissions are granted to the user by an administrator or via federation. It is always recommended that you identify a few users as administrators and grant them admin privileges to AWS. Going forward, these administrators can grant permissions to other users via IAM. They can provide fine-grained access to each user depending on their job role. For example, if a person needs to access only the web servers, then the administrator can grant that user access to specific EC2 servers. Similarly, if a developer wants to work with a database, administrators can grant that user read-only information from RDS. When a user is created via IAM, the user doesn’t have any security credentials either. The administrator needs to assign the security credentials followed by the permissions before the user can log in to the system.
These are the steps when creating a user via IAM:
1. Create a user via IAM.
2. Provide security credentials.
3. Attach permissions, roles, and responsibilities.
4. Add the user to one or more groups (covered in the next section).
The first time you create an AWS account, you create the AWS root account, which has unrestricted access to all the resources within AWS. The root account is a superuser account, and it can be compared to a root user of UNIX, which is a superuser and has all the privileges. There is no way you can restrict any privileges from the root account; therefore, it is important to secure it. The root account also has your AWS billing information. After creating the root account, you should create an IAM user with administrative access and should never log in using the root account. In other words, you should do all your day-to-day work using the administrative account and not via the root account. Needless to say, the root credentials should not be shared with anyone and should be kept very secure. To sign in via root credentials, you have to use the e-mail ID associated with the account and a password. You can also set up multifactor authentication along with the root user to safeguard it.
Since you cannot use the root account for the day-to-day administration of your AWS account, you need to create an IAM user with administrative privileges. When you have hundreds or thousands of users who want to use the service or resources of AWS within your account, you don’t share the root privilege with them; you instead create different IAM users with different privileges according to their job profile. These IAM users are part of the same AWS account and not separate accounts. These IAM users have their individual usernames and passwords to log in to the AWS console. You can also create an individual access key for each user so that the user can make programmatic requests to work with resources in your account. If users want to make programmatic calls to AWS from the AWS CLI or SDKs or API calls for individual AWS services, they need access keys, which you can create via IAM. When you create an access key, IAM returns the access key ID and secret access key that can be passed on to the user associated with it. Please note for security reasons the access key is accessible only at the time you create it. If a secret access key is lost, you must delete the access key for the associated user and create a new key.
When you sign in as the root user, you have complete, unrestricted access to all resources in your AWS account, including access to your billing information and the ability to change your password. This level of access is necessary when you initially set up the account. As mentioned, you should not use root user credentials for everyday access or share your root user credentials with anyone because doing so gives them unrestricted access to your account. It is not possible to restrict the permissions that are granted to the AWS account, so you should adhere to the best practice of using the root user only to create your first IAM user and then securely locking away the root user credentials.
Groups
IAM groups are similar to groups in a UNIX operating system. If you are not familiar with UNIX groups, don’t worry. Say in your company there are 50 developers; every time a new developer joins, you give that person the same set of roles and responsibilities just like any other developer. Say for your organization there are 20 different roles and privileges your developer needs. So, when the developer joins the company, you provision the user using IAM and explicitly assign that person those 20 roles and privileges, and you keep on doing the same thing every time a new developer joins. However, instead of manually assigning these 20 roles and privileges every time a developer joins, you can create a group for developers and assign the 20 roles and privileges that all the developers use to this group. Now whenever a new developer joins, instead of explicitly assigning that person these roles and privileges, you can just add the user to the developer group. By doing this, the new developer will automatically inherit the 20 roles and privileges that the group has. You can create various groups as per the job specifications. For example, you can have a separate group for administrators, a separate group for DBAs, a separate group for developers, a separate group for folks from the DevOps team, and so on.
If someone is a DBA but needs developer access as well, you just need to assign this user to both the DBA and developer groups, and by doing that the person has access to both. Similarly, if a developer becomes a DBA, you can simply remove that user from the developer group and add the user to the DBA group.
These are the characteristics of IAM groups:
• A group consists of multiple roles and privileges, and you grant these permissions using IAM.
• Any user who is added to a group inherits the group’s roles and privileges.
• You can add multiple users in a group.
• A user can be part of multiple groups.
• You can’t add one group into another group. A group can contain only users and not other groups.
• There is no default group that automatically includes all users in the AWS account. However, you can create one and assign it to each and every user.
Roles
As you have learned, there can be two types of AWS users: IAM users who have a permanent identity in AWS and federated users who don’t have permanent identities. Since IAM users have permanent identities associated to permissions, they can do any task associated with their permission. Since federated users do not have permanent identities, the way you control their permission is by creating a role. That does not mean you cannot associate an IAM user with a role; you can very well associate an IAM user with a role.
Using roles you can define a set of permissions to access the resources that a user or service needs, but the permissions are not attached to an IAM user or group. For example, a specific application can access S3 buckets by assuming a role. Similarly, a mobile application can access the EC2 server in the back end by assuming a role. The role can be assumed by applications or services during the execution or at runtime. Thus, an IAM role is similar to a user, in that it is an AWS identity with permission policies that determine what the identity can and cannot do in AWS. However, instead of being uniquely associated with one person, a role is intended to be assumable by anyone who needs it. Since a role doesn’t have any credentials (password or access keys) associated with it, when a user is assigned a role or when an application assumes a role, the access keys or security credentials are created dynamically by AWS during runtime and are provided to the user or application. The advantage of this is that you don’t have to share the long-term security credentials to the application that requires access to a particular resource. Therefore, you can say that a role is an IAM entity that defines a set of permissions for making AWS service requests.
These are some of the use cases where you would use roles:
• To delegate access to users, applications, or services that don’t normally have access to your AWS resources
• When you don’t want to embed AWS keys within the app
• When you want to grant AWS access to users who already have identities defined outside of AWS (for example, corporate directories)
• To grant access to your account to third parties (such as external auditors)
• So that applications can use other AWS services
• To request temporary credentials for performing certain tasks
When you create a role, you need to specify two policies. One policy governs who can assume the role (in other words, the principal ). This policy is also called the trust policy. The second policy is the permission or access policy, which defines what resources and actions the principal or who is assuming the role is allowed access to. This principal can be anyone who would be assuming the role. It can be a third-party user, an AWS service such as EC2 or DynamoDB, an identity provider, and so on. The principal can even be an IAM user from a different account; of course, it can’t be from your account.
IAM Hierarchy of Privileges
If you have to classify the AWS users into the hierarchy of privileges, it is going to follow this order, with the most powerful first and least powerful last:
• AWS root user or the account owner This user has unrestricted access to all enabled services and resources.
• AWS IAM user In this case, the user has limited permissions. The access is restricted by group and user policies.
• Temporary security credentials Access is restricted by generating identities and further by policies used to generate tokens.
IAM Best Practices
The following are some best practices for using IAM.
Use the IAM User
Immediately after creating the AWS account, create an IAM user for yourself and assign admin privileges. Lock down your root user. Never use the root user’s access key for any programmatic requests to AWS. Create individual IAM users for anyone who needs access to your AWS account.
Create a Strong Password Policy
Set a strong password policy and make sure the password expires after 90 days. Make sure the password has at least one uppercase letter, one lowercase letter, one symbol, and one number; it should be a minimum of eight to ten characters.
Rotate Security Credentials Regularly
Use the Access Key Last Used to identify and deactivate credentials that have been unused in 90 or more days. Enable credential rotation for IAM users. Use the Credential Report to audit credential rotation.
Enable MFA
Enable MFA for root and critical accounts with superuser privileges. MFA provides an additional layer of protection, and using it will make sure your account is protected.
Manage Permissions with Groups
Instead of assigning permissions to individual users, create groups that relate to job functions and attach policies to groups. The biggest advantage of this is that it reduces the complexity of access management as the number of users grows. It also reduces the opportunity for a user to accidentally get excessive access. It is an easy way to reassign permissions based on a change in responsibility and to update permissions for multiple users.
Grant the Least Privileges
It is important to use the principle of least privilege for managing the users. Always start with a minimum set of permissions and grant additional permissions only as necessary. This minimizes the chances of accidentally performing privileged actions. Since it is easier to relax than to tighten up, you can always add privileges as and when needed.
Use IAM Roles
You should always use IAM roles to delegate cross-account access, to delegate access within an account, and to provide access for federated users. If you use roles, then there is no need to share security credentials or store long-term credentials, and you have a clear idea of and have control over who has what access.
Use IAM Roles for Amazon EC2 Instances
If you have an application that runs on an Amazon EC2 instance and it needs to access other AWS services, you need to assign the application credentials. The best way to provide credentials to an application running on an EC2 instance is by using IAM roles.
Use IAM Policy Conditions for Extra Security
IAM policies allow access to a resource, but by using policy conditions, you can set up finer-grained conditions for the access. For example, using policy conditions, you can provide access on a particular day and time from a specified IP address.
Enable AWS CloudTrail
It is important that you have the ability to audit in your AWS ecosystem. You must ensure that AWS CloudTrail is enabled in all regions and that the AWS CloudTrail log file validation is enabled. It is also important to make sure that the Amazon S3 bucket of CloudTrail logs is not publicly accessible.

TIP As a solutions architect, you should use these best practices on a day-to-day basis and not just for exam preparation.
AWS Compliance Program
Amazon Web Services Compliance Program enables customers to understand the robust controls in place at AWS to maintain security and data protection in the cloud. As systems are built on top of the AWS cloud infrastructure, compliance responsibilities will be shared. By tying together governance-focused, audit-friendly service features with applicable compliance or audit standards, AWS Compliance features build on traditional programs, helping customers to establish and operate in an AWS security control environment. The IT infrastructure that AWS provides to its customers is designed and managed in alignment with security best practices and a variety of IT security standards, including the following:
• SOC 1/SSAE 16/ISAE 3402 (formerly SAS 70)
• SOC 2
• SOC 3
• FISMA, DIACAP, and FedRAMP
• DOD CSM Levels 1–5
• PCI DSS Level 1
• ISO 9001/ISO 27001
• ITAR
• FIPS 140-2
• MTCS Level 3
In addition, the flexibility and control that the AWS platform provides allow customers to deploy solutions that meet several industry-specific standards, including the following:
• Criminal Justice Information Services (CJIS)
• Cloud Security Alliance (CSA)
• Family Educational Rights and Privacy Act (FERPA)
• Health Insurance Portability and Accountability Act (HIPAA)
• Motion Picture Association of America (MPAA)
Many of these reports can be downloaded directly from the admin console from the Artifact menu in the Security, Identity & Compliance section. Some of these artifacts may need a nondisclosure agreement (NDA). If you need a report that needs an NDA, please work with your sales representative to start the process.
Shared Responsibility Model
Let’s talk about how security in the cloud is slightly different than security in your on-premises data centers. In an on-premises data center, you are solely responsible for the overall security, which includes the physical security of the data center as well as the security of the servers, network, storage, databases, and applications. When you move computer systems and data to the cloud, security responsibilities become shared between you and your cloud service provider. In this case, AWS is responsible for securing the underlying infrastructure that supports the cloud, and you’re responsible for anything you put on the cloud or connect to the cloud. This shared security responsibility model can reduce your operational burden in many ways, and in some cases may even improve your default security posture without additional action on your part. The infrastructure consists of the hardware, software, networking, and data centers that run AWS services. AWS is responsible for protecting this infrastructure. Since security is the topmost priority for AWS, no one can visit the data centers.
AWS follows the shared security model in which there are some elements that AWS takes responsibility for and other areas that customers must address. As shown in Figure 5-2, AWS is responsible for the security in the cloud, and customers are responsible for security and compliance in the cloud.

Figure 5-2 AWS shared responsibility model

EXAM TIP You should clearly understand what your responsibility is versus AWS’s responsibility. There are often a few questions on the shared responsibility model.
AWS Responsibility
As discussed regarding the shared responsibility model, there are some elements that AWS takes responsibility for and other areas that customers must address. These are AWS’s responsibilities:
• Physical security of the data center Amazon has been building large-scale data centers for many years. It has strict controls in place for the physical security of the data centers. Amazon is responsible for the physical security of the data centers, and to do that, it logs and audits the employees who access the data center, ensures that proper video surveillance is in place, and protects the data center from fire by installing fire detection and suppression equipment. The data centers are designed to be fully redundant in terms of power. In addition, AWS has uninterruptible power supply (UPS) units that provide backup power in the event of an electrical failure. AWS makes sure that the data center has proper climate control in place. AWS has segregation of duty in place, which means that any employee with physical access doesn’t have logical privileges and that any employee who visits the data center does not have AWS console access.
• Amazon EC2 security AWS is responsible for securing the host operating system where AWS has root access to the operating system. (For example, if you deploy your database on RDS, you don’t have access to the operating system hosting the database.) Those administrators who have a business need to access the management plan of the host OS are required to use multifactor authentication to gain access. All these activities are logged and audited. For the guest operating system, where the virtual instances are controlled by you (the AWS customer), you have full root access or administrative control over accounts, services, and applications. AWS does not have any access rights to your instances or the guest OS. In this case, AWS can’t even log in to your operating system. In addition to this, Amazon EC2 provides a complete firewall solution. AWS provides mandatory inbound firewalls with default deny mode in the form of security groups. You can configure the firewall using security groups. Multiple instances running on the same physical machines are isolated from each other via the Xen hypervisor.
• Network security AWS is responsible for managing the network infrastructure, and it has implemented a world-class network infrastructure that is carefully monitored and managed. AWS has redundant network devices, including a firewall, to monitor and control internal and external communications. ACLs, or traffic flow policies, are established on each managed interface, which manage and enforce the flow of traffic. AWS also takes care of network monitoring and protection and has implemented a variety of tools to monitor server and network usage, port scanning activities, application usage, and unauthorized intrusion attempts. In addition, AWS has several strict controls in place; for example, IP spoofing is prohibited at the host OS level, packet sniffing is ineffective (protected at the hypervisor level), unauthorized port scanning is a violation of TOS and is detected/blocked, and inbound ports are blocked by default.
• Configuration management Whenever new hardware is provisioned, configuration management software is installed. This software runs on all UNIX machines to validate that they are configured properly and all the software installed is in compliance with standards determined by the role assigned to the host. This software also makes sure that all updates are done in such a manner that they will not impact the customer. Configuration management makes sure that all the changes are authorized, logged, tested, approved, and documented. In addition, AWS communicates to its customer via e-mail or through the AWS Service Health Dashboard (http://status.aws.amazon.com/) when there is a potential for a service to be affected.
• Highly available data center AWS is responsible for making sure that all the data centers are highly available at all times. All data centers are always online and serving customers, and there is no concept of a cold data center. As a result, all the AZs are always active at any point in time. Every AZ has redundant architecture built in, which provides fault-tolerant services. In addition, you should architect your application in such a way that it is leveraging multiple AZs.
• Disk management AWS has proprietary disk management in place, which prevents customers from accessing each other’s data. The way it is done is that the customer instances have no access to raw disk devices but instead are presented with virtualized disks. The disk virtualization layer automatically resets every block of storage used by the customer. All the hard drives are wiped prior to use. In addition, customers can encrypt the hard drives for additional security.
• Storage device decommissioning Whenever a storage device comes to the end of its life, AWS uses DoD 5220.22-M (“National Industrial Security Program Operating Manual”) and NIST 800-88 (“Guidelines for Media Sanitization”) to wipe off all the data. Once the data has been wiped, the disks are degaussed and then finally physically destroyed.
Customer’s Responsibility
The customer’s responsibility differs depending on the type of services being used from AWS. Figure 5-3 shows the responsibilities if you are using AWS for Infrastructure as a Service (IaaS) such as EC2, VPC, networking, and so on. In that case, you are responsible for the following:

Figure 5-3 Customer responsible for compliance of application
• Operating system You are responsible for the management of the guest OS. It is your responsibility to make sure that the OS is regularly patched and has all the security updates and bug fixes.
• Application You are responsible for managing any application that you run on top of AWS. Management includes encrypting data, managing application users and their privileges, and so on. You are also responsible for all the security and compliance of the application. For example, if your application needs to be PCI compliant, just deploying it into AWS (since the AWS infrastructure is PCI compliant) won’t make it PCI compliant. You need to make sure that you deploy all the steps for being PCI compliant from the application tier as well.
• Firewall You need to make sure the proper firewalls at the OS level (security groups) and across the network level (NACL) are configured.
• Network configuration VPC gives you the ability to run your own private data center in the cloud, but you are responsible for its configuration. Since AWS does not have access to your VPC or anything that you run within your VPC, it is your responsibility to make sure that it is secure and that the relevant people have the relevant access. Similarly, you need to make sure the resources you deploy on the VPC are configured correctly. (For example, the database server should not be configured in a public subnet.)
• Service configuration You should have a proper service configuration in place so that you know who is installing what on the servers or who is making what changes in your infrastructure.
• Authentication and account management You are responsible for the authentication and account management for both AWS users and application users. You can use IAM to manage the AWS users, but for managing the application users, you may have to explore this on a case-to-case basis. For example, if you want to deploy SAP on AWS, you need to manage all the SAP users as well.
Figure 5-4 summarizes the AWS and customer’s responsibilities to make a fully compliant application.

Figure 5-4 AWS and customer’s responsibility for compliance

CAUTION You should pay more attention to the customer’s responsibilities as a solutions architect because a small security glitch can cause a big nightmare.
In addition to IaaS, you can use AWS as a Platform as a Service (PaaS). If you host your database in RDS, or run your data warehouse in Redshift, or run your NoSQL database in DynamoDB, all the work related to hosting the operating system, managing OS firewalls, launching and maintaining instances, patching the guest OS or database, or replicating databases, and so on is taken care of by AWS. You should protect your AWS account credentials and set up individual user accounts with Amazon IAM so that each of your users has their own credentials and you can implement segregation of duties. You are also responsible for the data residing in these services such as RDS and encryption. Figure 5-5 summaries the responsibilities when using AWS in this way.

Figure 5-5 AWS and customer’s responsibility when using PaaS
In addition to PaaS, you can use AWS like Software as a Service (SaaS). A common example for using AWS as a SaaS is S3. In this case, you just need to manage the data, and you are responsible for encrypting it. Figure 5-6 summaries the responsibilities when using AWS in this way. AWS provides a foundation for partners to build SaaS solutions. Most of them are available on the AWS Marketplace.

Figure 5-6 AWS and customer’s responsibility when using SaaS

TIP In real life as a solutions architect, wherever possible you should try to use more and more SaaS and PaaS instead of IaaS.
The amount of security configuration work you have to do varies depending on which services you select and how sensitive your data is. However, there are certain security features—such as individual user accounts and credentials, SSL/TLS for data transmissions, and user activity logging—that you should configure no matter which AWS service you use. This is discussed in detail in Chapter 9.
AWS Security Products and Services
In this section we are going to learn about some of the AWS security products and services. Although many of these services are not covered in the examination, as a solutions architect, you should know the important security offerings; therefore, I have covered them in detail.
Resource Access Manager
Using Resource Access Manager you can share your AWS resource with either any other AWS account or with an account through AWS Organizations (AWS Organizations is covered later in this book). When you share your AWS resources with Resource Access Manager, it reduces the operational overhead since you don’t have to provision duplicate resources in each and every account. Moreover, using policies and permissions, you can achieve a higher level of security control and can do fine-grained auditing on the resources as well.
In order to share an AWS resource, first you need to create a resource share. To create a resource share, you need the details of the AWS resource you would like to share, a name for the resource share, and with whom you would like to share the resource. It can be a specific AWS account, organization unit, or an entire organization from AWS Organizations. There are no charges for creating a resource share.
AWS Secrets Manager
One of the common challenges with any organization is managing secrets, and we often hear people saying
• I don’t want to e-mail secrets.
• I want to prevent developers from viewing or sharing secrets.
• I want visibility into who used which secret when.
• I want to enable teams to operate quickly, without waiting on the security team to create and provision secrets.
• I want to stop secret sprawl.
• I want to roll out secrets safely.
• I want to rotate secrets without system downtime, and so on.
What if you can do all the mentioned secrets without any challenges? AWS Secret Manger enables customers to manage, retrieve, and rotate database credentials, API keys, and other secrets throughout their life cycle.
It helps the IT admins to store and manage access to secrets securely and at scale, security admins to audit and monitor the use of secrets and rotate secrets without a risk of breaking applications, and developers to avoid dealing with secrets in their applications.
Using this service you can securely store the secrets centrally and retrieve them programmatically; the secrets are encrypted by default using encryption keys owned by the customer. It also supports VPC endpoints via AWS Private Links, and this service is integrated with CloudFormation. It is PCI, HIPAA, and ISO complaint. In order to prevent secret sprawl, you can control access to fine-grained access control as well as audit at a gradual level. It is also integrated with CloudTrail and CloudWatch, which provides you better visibility. You can also rotate the secrets safely. It has built-in integrations for rotating all Amazon Relational Database Service database types as well as AWS Lambda.
Amazon GuardDuty
Amazon GuardDuty is an intelligent threat detection service, which continuously monitors and protects AWS accounts, along with the applications and services running within them. It detects both known and unknown threats. In order to do so it uses the power of artificial intelligence and machine learning. It is integrated with threat intelligence. The way it works is it analyzes your account and network activity found in AWS CloudTrail Events, Amazon VPC Flow Logs, and DNS logs and then delivers detailed and actionable alerts that are easy to integrate with existing event management and workflow systems. It is very simple to use Amazon GuardDuty. It can be very easily enabled from the AWS console, and once it’s enabled, it immediately starts analyzing all the data in real time. Whenever a threat is detected, Amazon GuardDuty delivers a detailed security finding to the GuardDuty console and AWS CloudWatch Event. The finding includes category, resource affected, and metadata associated with the resource. GuardDuty works independently, and as a result there is no performance impact and there is no impact to your account or workload. GuardDuty’s detection is divided into the following three categories:
• Reconnaissance This consists of any activities suggesting reconnaissance by an attacker, which includes failed login requests, unblocking IP ports, VPC port scanning, and very unusual API activity.
• Instance compromise Anything to do with instance compromise is captured here. It can be DDoS attack, bitcoin mining, denial-of-service activity, an unusually high volume of network traffic, and so on.
• Account compromise This consists of all the activities that try to compromise an account, for example, login requests from an unknown geolocation via proxy, unusual volume of API calls from an unknown geography, unusual infrastructure launches in an unusual region, and so on.
Amazon Inspector
Amazon Inspector is a service that analyzes your EC2 instances to identify potential security and configuration issues. Inspector assesses your security posture by looking at the versions, patch levels, configurations, and operating behavior of operating systems and applications and evaluates these against thousands of common vulnerabilities and exposures. Inspector not only identifies where your environments may be vulnerable but prioritizes these findings by severity level and provides recommendations on how to fix these to secure your environment. Amazon Inspector can be easily set up to test the security of your applications in all your environments throughout your continuous integration and continuous deployment (CI/CD) cycles.
These are the things that Amazon Inspector does. It discovers the security risks in your AWS environment, identifies vulnerabilities based on leading industry sources, checks your environment against security best practices, and finally includes recommendations on how to remediate them. Its built-in integrations with AWS services make it easy to run assessments and manage issues identified on your workloads.
Amazon Inspector has a library of thousands of security checks that are grouped into different rules packages so you can choose the type of security analysis to perform in your assessment run. The security checks allow you to assess your environment for common vulnerabilities and exposures, best practice security configurations, and runtime behavior on demand.
Amazon Macie
Amazon Macie helps you protect your data in Amazon S3 by helping you classify what data you have, the business value of that data, and the behavior associated with access to that data. It uses machine learning to discover, classify, and protect sensitive data automatically in AWS. Amazon Macie uses machine learning to recognize sensitive data such as personally identifiable information (PII) and intellectual property, assigns a business value, and provides visibility into where this data is stored and how it is being used in your organization. Amazon Macie continuously monitors data access activity for anomalies and delivers alerts when it detects risk of unauthorized access or inadvertent data leaks. You can use Amazon Macie to protect against security threats by continuously monitoring your data and account credentials. When alerts are generated, you can use Amazon Macie for incident response, using Amazon CloudWatch Events to take action swiftly to protect your data.
AWS Certificate Manager
AWS Certificate Manager (ACM) is used to manage Secure Sockets Layer (SSL) certificates for use with AWS services. Using ACM, you can provision, manage, and deploy SSL/Transport Layer Security (TLS) certificates. You can protect and secure web sites as well. You can also use ACM to obtain, renew, and import certificates. You can use certificates stored in ACM with Elastic Load Balancer and Amazon CloudFront. The best part is there’s no charge for the SSL/TLS certificates you manage with AWS Certificate Manager. You only pay for the AWS resource you use for the hosted application or web site.
AWS Web Application Firewall
AWS Web Application Firewall (WAF) is a web application firewall that detects malicious traffic targeted at the web applications. Using WAF, you can create various rules with which you can protect against common attacks such as SQL injection and scripting. Using these rules, you can block the web traffic to certain IP addresses, filter certain traffic from certain geographical locations, and so on, thus safeguarding your application.
If you want to enable AWS WAF across multiple AWS accounts and resources from a single location, you can use AWS Firewall Manager, which is integrated with AWS Organizations. Using AWS Firewall Manager, you can write company-wide rules from one location and enforce them across applications protected by AWS WAF. AWS Firewall Manager monitors for new resources or accounts created to ensure that they comply with a mandatory set of security policies from day one.
AWS Shield
AWS Shield is a managed service that protects against distributed denial-of-service (DDoS) attacks targeted at web applications. There are two tiers of AWS Shield: Standard and Advanced. AWS Shield Standard is free and protects against most commonly occurring DDoS attacks against web applications. With AWS Shield Advanced, you get higher levels of protection against attacks targeting not only web applications but also Elastic Load Balancer, Amazon CloudFront, and Amazon Route 53.
AWS CloudHSM
The AWS CloudHSM service provides you with a dedicated hardware security module (HSM) in the AWS cloud. It helps you to meet all your contractual and regulatory compliance requirements. The HSM is a tamper-resistant hardware that provides secure key storage and cryptographic operations. Using this, you can easily generate and manage your own keys on the AWS cloud. It can be used for many purposes, such as encrypting a database, signing a document, digital rights management, and so on.
AWS KMS
AWS Key Management Service (KMS) is a managed service that helps you create and control the keys used for cryptographic operations. AWS KMS presents a single control point from which to manage keys and define policies consistently across integrated AWS services and your own applications. KMS uses hardware security modules to protect the keys. With KMS, you can centrally manage the encryption keys that control access to your data. It can also help developers who need to digitally sign or verify data using asymmetric keys.
Lab 5-1: Creating IAM Users, Groups, and Roles
This lab will walk you through connecting to the instance and configuring security credentials so that you can interact with the AWS APIs and command-line tools. This lab will cover the following topics:
• Creating an IAM group and adding an IAM user to the group
• Exploring the properties of an IAM user
• Creating an IAM role for EC2
Let’s start by creating a group first. To do that, go to the IAM dashboard in the AWS console. Search for IAM or select IAM under Security, Identity & Compliance.

To create a group, select Groups on the left side and then click the Create New Group button.


Type PowerUser into the Group Name text box and click Next Step.

Type Power in the filtering text box and then select PowerUserAccess. Click Next Step.

This will associate the PowerUserAccess IAM policy with your new group and allow group members to perform any AWS action except IAM management. Click Create Group.

You should be able to see the newly created group from the console.

To create a user, select Users and then click the Add User button.

Enter user1 in the first text box next to User Name. Select the check box next to Programmatic Access and click Next: Permissions.

To add the user to the group, select Add User To Group and then click the check box next to the PowerUser group; click Next: Review.

Click Create User.

Click Close. Your new user and group have now been created, and your user is a member of your group.

Managing IAM User Permissions and Credentials
Now that you have created your first IAM user and group, let’s take a look at the IAM user properties. Click the Users option in the left menu and then select the user’s account that you just created.
Notice that user1 is a member of the PowerUser group.

Now select the Permissions tab to see the individual user and group policies that will be applied to this account. Note that this user has only the PowerUserAccess group policy applied to the account.

Now select the Security Credentials tab. This is where you can assign or change a user’s console password and multifactor authentication device.

From here you can also create, rotate, or revoke a user’s API access keys (for using the AWS command-line tools or other direct access to the AWS APIs through custom or third-party applications).
IAM Roles for Amazon EC2
Applications or command-line tools running on Amazon EC2 instances that make requests to AWS must sign all AWS API requests with AWS access keys. AWS IAM roles for EC2 instances make it easier for your applications and command-line tools to securely access AWS service APIs from EC2 instances. An IAM role with a set of permissions can be created and attached to an EC2 instance on launch. AWS access keys with the specified permissions will then be automatically made available on EC2 instances that have been launched with an IAM role. IAM roles for EC2 instances manage the process of securely distributing and rotating your AWS access keys to your EC2 instances so that you don’t have to do this.
Using IAM roles, for instance, you can securely distribute AWS access keys to instances and define permissions that applications on those instances use when accessing other services in AWS. Here are some things you should know about using IAM roles for instances:
• AWS access keys for signing requests to other services in AWS are automatically made available on running instances.
• AWS access keys on an instance are rotated automatically multiple times a day. New access keys will be made available at least five minutes prior to the expiration of the old access keys.
• You can assign granular service permissions for applications running on an instance that make requests to other services in AWS.
• You can include an IAM role when you launch on-demand, spot, or reserved instances.
• IAM roles can be used with all Windows and Linux AMIs.

CAUTION If you are using services that use instance metadata service (IMDS) with IAM roles, you should ensure that you do not expose your credentials when the services make HTTP calls on your behalf. Either you should include logic to ensure that these services cannot leak information from IMDS, or you should have the appropriate firewall rules in place so that the services cannot access IMDS. Types of services that could expose your credentials include the following:
• HTTP proxies
• HTML/CSS validator services
• XML processors that support XML inclusion
To create an IAM role for EC2, click the Roles link on the left menu and click Create Role.

Select AWS Service as the type of trusted entity.

Select EC2 on the Select Your Use Case screen.

IAM supports several types of roles. Select the Amazon EC2 Service Role for this example, but know that IAM roles can be used to grant access to AWS services, other AWS accounts, and third-party identity providers.
You now need to set permissions for this new role. Type S3 and then select AmazonS3FullAccess; click Next: Review.

You now have the opportunity to review the role information. Give a name for the role you are going to create. In this case, name it EC2S3Full. Click Create Role.

Now go to the Roles screen and search for that role. You will see that your role exists.

You can now use the newly created IAM role when you launch an EC2 instance. For example, in the EC2 console, you can select the role as part of the launch process. Once the instance is launched, applications and tools that access AWS services will automatically pick up temporary credentials made available to the instance by the infrastructure.

Congratulations! You have created your first IAM user, group, and role!
Chapter Review
In this chapter, you learned what AWS IAM is. IAM allows you to implement a comprehensive access control on AWS resources by giving you the ability to authenticate, authorize, and log all access. Therefore, you can implement the concepts of least privilege and segregation of duties. You can log every allow and deny in CloudTrail for troubleshooting or auditing purposes.
You can use AWS IAM to securely control individual and group access to your AWS resources. You can create and manage user identities (called IAM users) and grant permissions for those IAM users to access your resources. You can also grant permissions for users outside of AWS. Any AWS customer can use IAM because the service is offered at no additional charge. You will be charged only for the use of other AWS services by your users.
A user is a unique identity recognized by AWS services and applications. Similar to a login user in an operating system like Windows or UNIX, users have unique names and can identify themselves using familiar security credentials such as passwords or access keys.
A group is a collection of IAM users. You can manage group membership as a simple list and add users to or remove them from a group. A user can belong to multiple groups. Groups cannot belong to other groups.
An IAM role is an IAM entity that defines a set of permissions for making AWS service requests. IAM roles are not associated with a specific user or group. Instead, trusted entities assume roles, such as IAM users, applications, or AWS services such as EC2. IAM roles allow you to delegate access with defined permissions to trusted entities without having to share long-term access keys. You can use IAM roles to delegate access to IAM users managed within your account, to IAM users under a different AWS account, or to an AWS service such as EC2.
You also studied the shared security model in which AWS is responsible for protecting the infrastructure that runs all of the services offered in the AWS cloud. This infrastructure is composed of the hardware, software, networking, and facilities that run AWS cloud services.
Customer responsibility is determined by the AWS cloud services that a customer selects. This determines the amount of configuration work the customer must perform as part of its security responsibilities. For example, services such as Amazon Elastic Compute Cloud (Amazon EC2) are categorized as Infrastructure as a Service and, as such, require the customer to perform all of the necessary security configuration and management tasks. If a customer deploys an Amazon EC2 instance, they are responsible for managing the guest operating system (including updates and security patches), any application software or utilities installed by the customer on the instances, and the configuration of the AWS-provided firewall (called a security group) on each instance.
Questions
1. Can you add an IAM role to an IAM group?
A. Yes
B. No
C. Yes, if there are ten members in the group
D. Yes, if the group allows adding a role
2. An IAM policy contains which of the following? (Choose two.)
A. Username
B. Action
C. Service name
D. AZ
3. What happens if you delete an IAM role that is associated with a running EC2 instance?
A. Any application running on the instance that is using the role will be denied access immediately.
B. The application continues to use that role until the EC2 server is shut down.
C. The application will have the access until the session is alive.
D. The application will continue to have access.
4. For implementing security features, which of the following would you choose?
A. Username/password
B. MFA
C. Using multiple S3 buckets
D. Login using the root user
5. Which is based on temporary security tokens? (Choose two.)
A. Amazon EC2 roles
B. Federation
C. Username and password
D. Using AWS STS
6. You want EC2 instances to give access without any username or password to S3 buckets. What is the easiest way of doing this?
A. By using a VPC S3 endpoint
B. By using a signed URL
C. By using roles
D. By sharing the keys between S3 and EC2
7. An IAM policy takes which form?
A. Python script
B. Written in C language
C. JSON code
D. XML code
8. If an administrator who has root access leaves the company, what should you do to protect your account? (Choose two.)
A. Add MFA to root
B. Delete all the IAM accounts
C. Change the passwords for all the IAM accounts and rotate keys
D. Delete all the EC2 instances created by the administrator
9. Using the shared security model, the customer is responsible for which of the following? (Choose two.)
A. The security of the data running inside the database hosted in EC2
B. Maintaining the physical security of the data center
C. Making sure the hypervisor is patched correctly
D. Making sure the operating system is patched correctly
10. In Amazon RDS, who is responsible for patching the database?
A. Customer.
B. Amazon.
C. In RDS you don’t have to patch the database.
D. RDS does not come under the shared security model.
Answers
1. B. No, you can’t add an IAM role to an IAM group.
2. B, C. A policy is not location specific and is not limited to a user.
3. A. The application will be denied access.
4. A, B. Using multiple buckets won’t help in terms of security. Similarly, leveraging multiple regions won’t help to address the security.
5. B, D. The username and password is not a temporary security token.
6. C. A VPC endpoint is going to create a path between the EC2 instance and the Amazon S3 bucket. A signed URL won’t help EC2 instances from accessing S3 buckets. You cannot share the keys between S3 and EC2.
7. C. It is written in JSON.
8. A, C. Deleting all the IAM accounts is going to be a bigger painful task. You are going to lose all the users. Similarly, you can’t delete all the EC2 instances; they must be running some critical application or something meaningful.
9. A, D. The customer is responsible for the security of anything running on the hypervisor, and therefore the operating system and the security of data are the customer’s responsibility.
10. B. RDS does come under a shared security model. Since it is a managed service, the patching of the database is taken care of by Amazon.